Events
Configure walkthrough photo defaults
Set whether damage annotation opens automatically during event photo walkthroughs for each service.
What you will accomplish
You will choose whether staff should automatically open the damage annotation tool when they capture walkthrough photos during an event—for example at storage intake or condition inspections.
When this is set up well:
- Intake staff mark existing scratches or dents on a vehicle diagram without an extra menu tap.
- Managers get consistent photo documentation across shifts—not only when someone remembers the markup step.
- Services that do not need damage markup (like a quick tour) can keep annotation off while intake keeps it on.
This setting is configured on each event type—there is no separate team-wide default on the Services & schedule page. Turn it on for the services that need it (often Vehicle Drop Off or Storage Intake) and leave it off for everything else.
When to use this setting
Turn Auto-open damage annotation on when:
- Your facility documents existing damage at intake and wants staff to mark scratches or dents on a vehicle diagram.
- Managers want a consistent photo workflow without relying on staff to remember an extra tap.
- Disputes about pre-existing damage are common—annotated photos protect your team and the customer.
Leave it off when:
- Most of your event types only need simple zone photos (front, rear, odometer) without damage markup.
- The service is quick and staff rarely need the damage diagram (for example a customer tour or pickup reminder).
Before you start
- You can open Settings > Services & schedule as a team admin.
- You know which event types use walkthrough photos (often Vehicle Drop Off, Storage Intake, or Inspection).
- If staff do not see any photo prompts during events, add required zones first in Configure photo rules.
Set auto-open for one event type
- Open Services & schedule
Go to Settings > Services & schedule.
Expected result: You see a grid of service cards (for example Vehicle Drop Off, Detail Appointment) plus a dashed Add a service tile.
- Open the event type editor
Find the service you want to change (for example Vehicle Drop Off).
Click Set up for the guided editor, or Advanced for the full settings page.
Expected result: The event type editor opens. Changes save automatically as you work.
- Find Photo Documentation
Scroll to the Photo Documentation section.
Look for Auto-open damage annotation.
Why this matters: When this is on, the damage markup screen opens right after staff take a walkthrough photo. That one less tap can mean the difference between documented damage and a missed scratch.
- Turn the switch on or off
Flip the switch to match how this service should behave.
Expected result: A short success message appears. The setting saves immediately for this event type only.
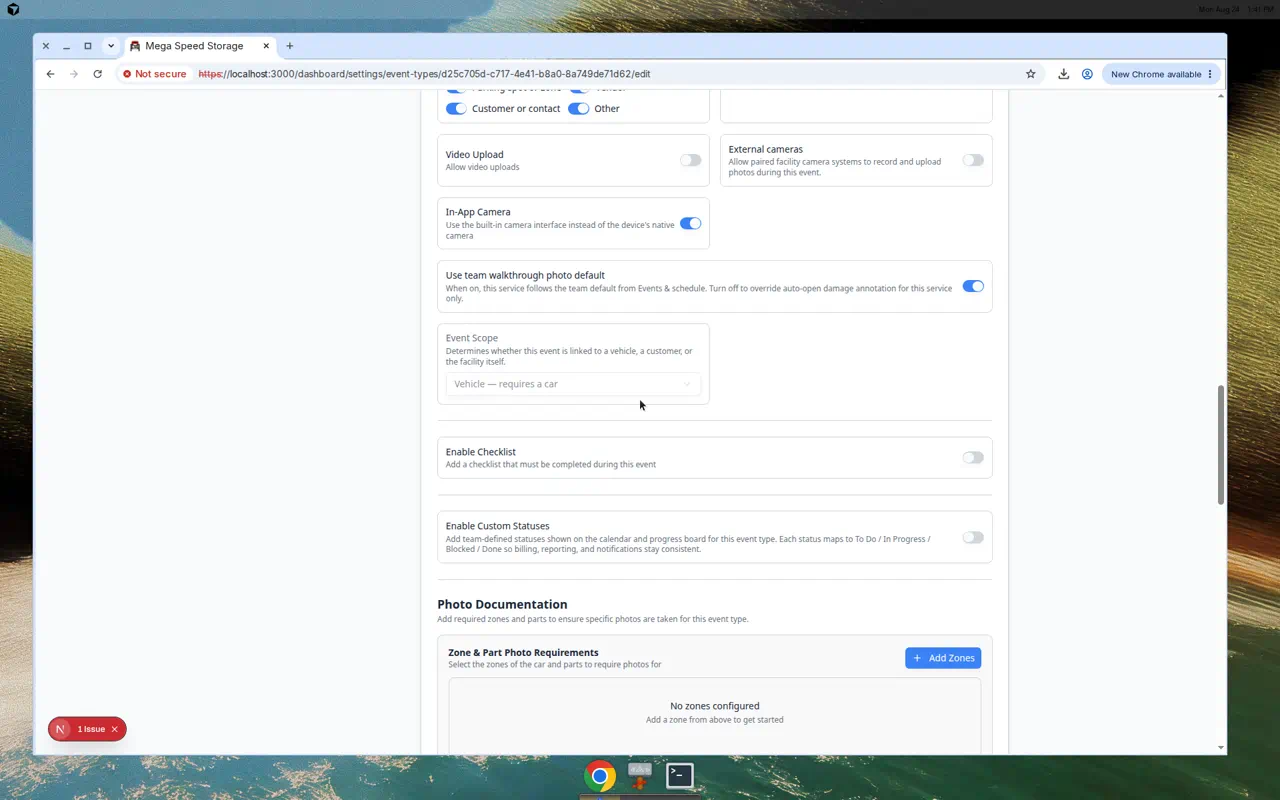
Set up intake vs other services
Most facilities turn auto-open on for intake and off for everything else.
Example setup for Mega Speed Storage:
| Service | Auto-open damage annotation |
|---|---|
| Vehicle Drop Off | On — staff mark existing damage at intake |
| Detail Appointment | Off — before/after photos only |
| Vehicle Pickup | Off — quick departure photos |
| Customer Tour | Off — no damage documentation needed |
What staff see during an event
Understanding the on-screen flow helps you train intake and explain the setting to managers.
With auto-open on: Staff tap a photo zone → take the picture → the damage annotation screen opens immediately → they mark any existing damage → return to the photo list.
With auto-open off: Staff take the photo → stay on the photo list → they can open annotation manually if your workflow allows it.
Neither setting replaces required photo zones. If a zone is required, staff must still capture it before completing the event.
Test the behavior
- Schedule a test event
Follow Test an event setup for the event type you changed. Use a test customer or add TEST in the notes so your team can spot the appointment later.
- Open Event from Schedule
On Schedule, open the test appointment and click Open Event.
Expected result: The event workflow opens with photo zones listed (if photo rules exist for this service).
- Take one walkthrough photo
Capture one required photo.
Expected result with auto-open on: The damage annotation screen opens without an extra menu tap.
Expected result with auto-open off: Staff stay on the standard photo list unless they choose annotation manually.
- Confirm other services were not changed
If you changed only one event type, repeat the test on a second service that should still have auto-open off.
Why this matters: This proves your intake service behaves differently—and that other services were not accidentally changed.
Troubleshooting
What to do next
- Add required photo zones in Configure photo rules.
- Train intake staff with Use the Create event home page.
- Run a full test with Test an event setup.
- Return to Events overview.