Facility Web Pages
Publish marketplace listings
Make cars, products, or services visible on customer-facing marketplace pages.
What you will accomplish
Your facility will show the right cars, products, or services on a marketplace page that matches your business rules (public, customers only, or signed-in users). You will preview the page as a customer before sharing the link.
Overview
Use this guide to show cars, products, services, or memberships on a customer-facing marketplace page.
When you finish, customers or prospects can open the marketplace and view items your facility wants to share.
Use marketplace listings when you want to:
- sell or promote cars
- offer storage plans or memberships
- show services customers can request or buy
- create a simple public catalog for your facility
Before you start
- Turn on Public Facility Pages in Settings > Website & customer app.
- Decide who should see the marketplace: everyone, all Car Storage Software users, or only your customers.
- Prepare customer-friendly names, descriptions, prices, and photos.
- Review payment processing before accepting online checkout for products.
Two marketplace pages to know
Your facility has two customer-facing marketplace URLs:
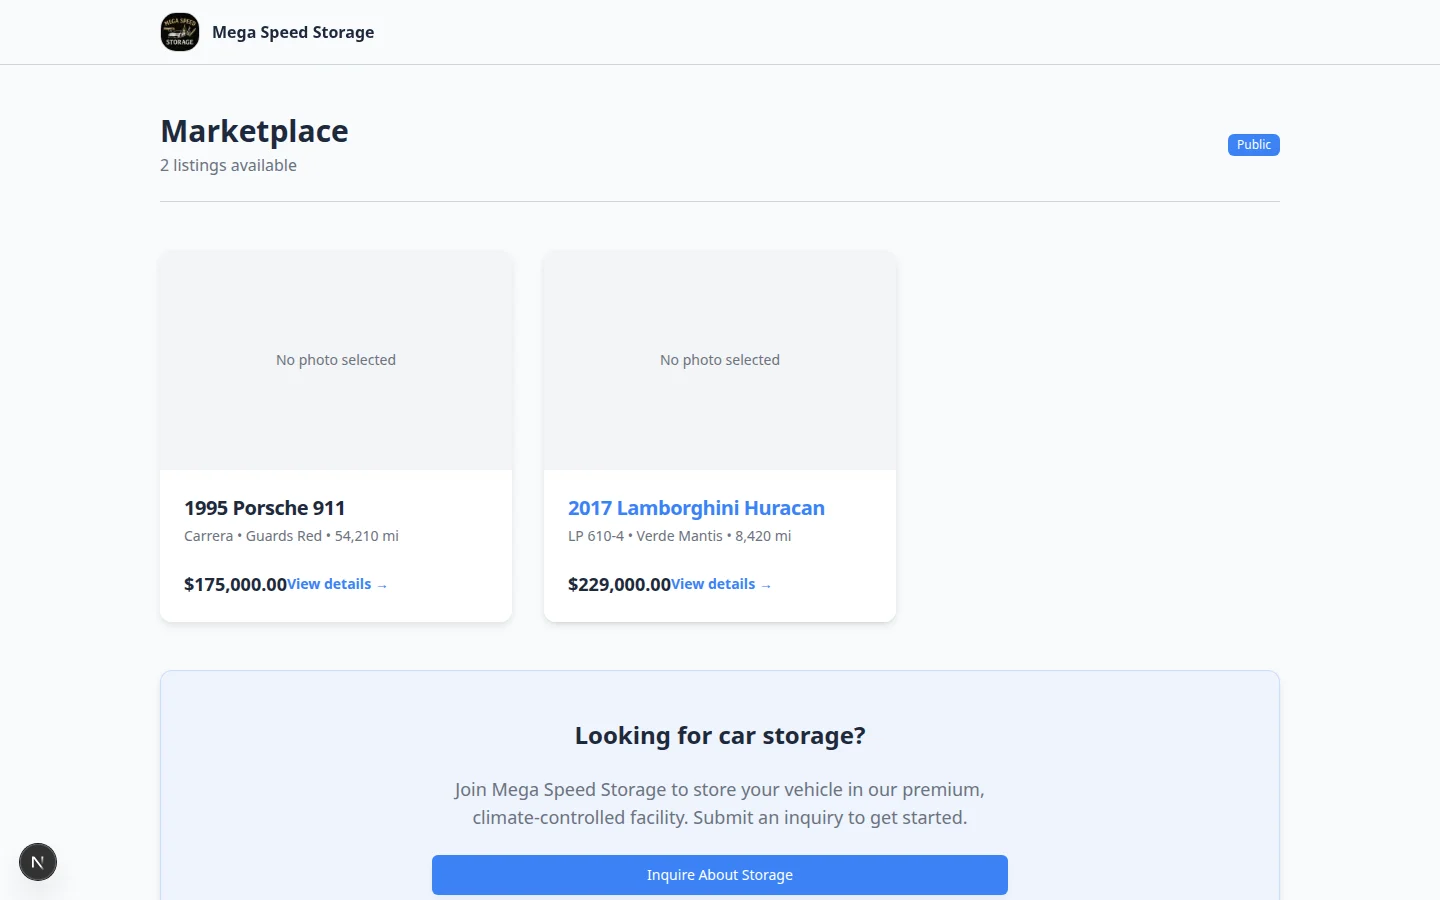
Vehicle marketplace — /facility/your-facility-name/marketplace — cars listed for sale or express interest.
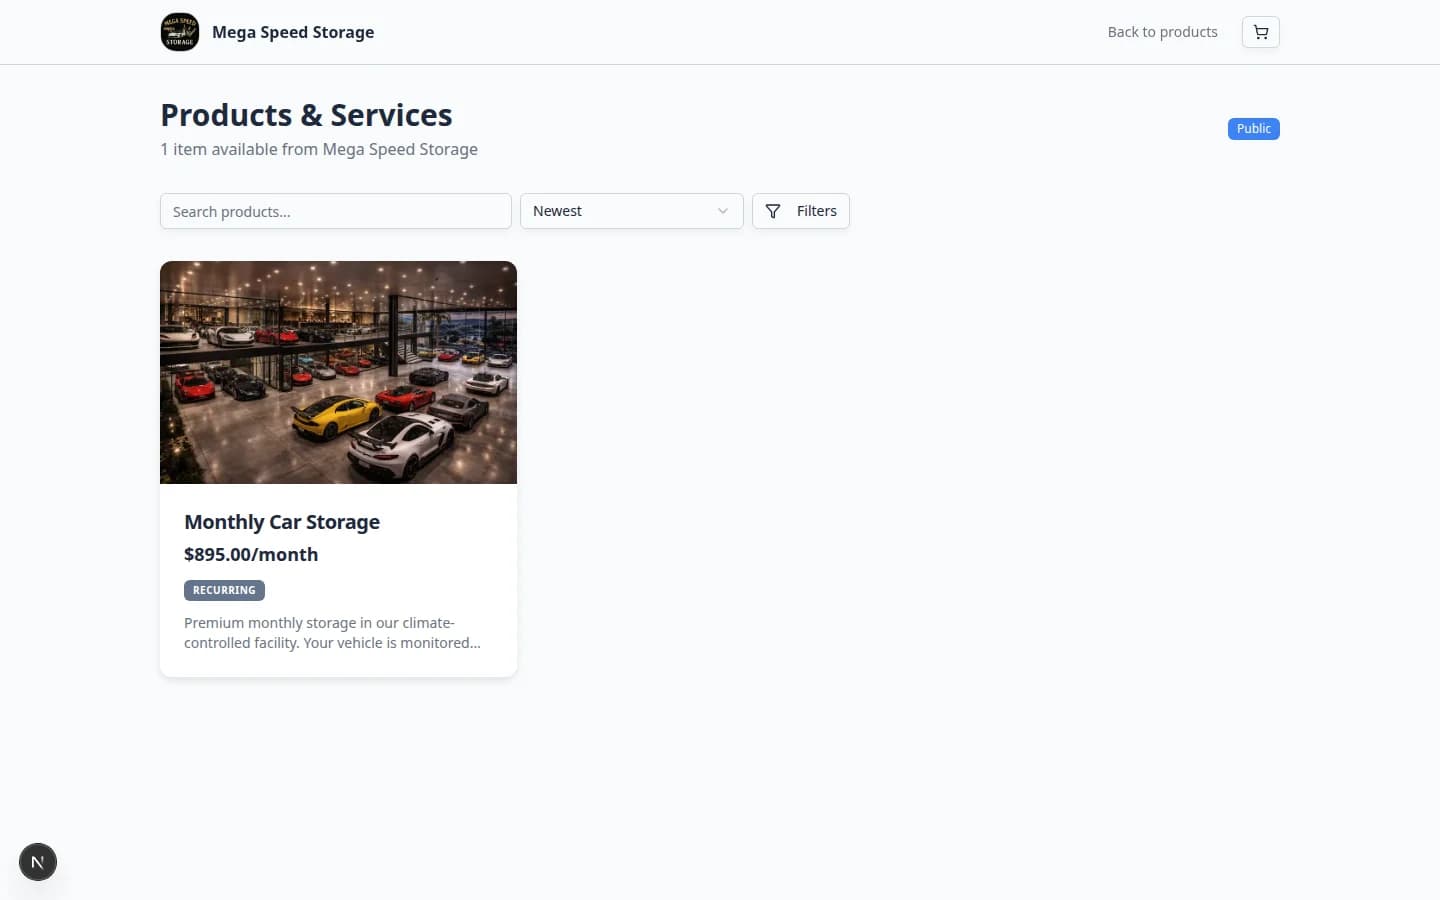
Product marketplace — /facility/your-facility-name/marketplace/products — storage plans, services, memberships, and other products with online checkout.
Customers see Cars for sale and Products as separate tabs or menu items on your public site when both are enabled.
Step 1: Turn on marketplace for your facility
Go to Settings > Website & customer app.
Scroll to Public website and open the Page editor.
Turn on the Marketplace section.
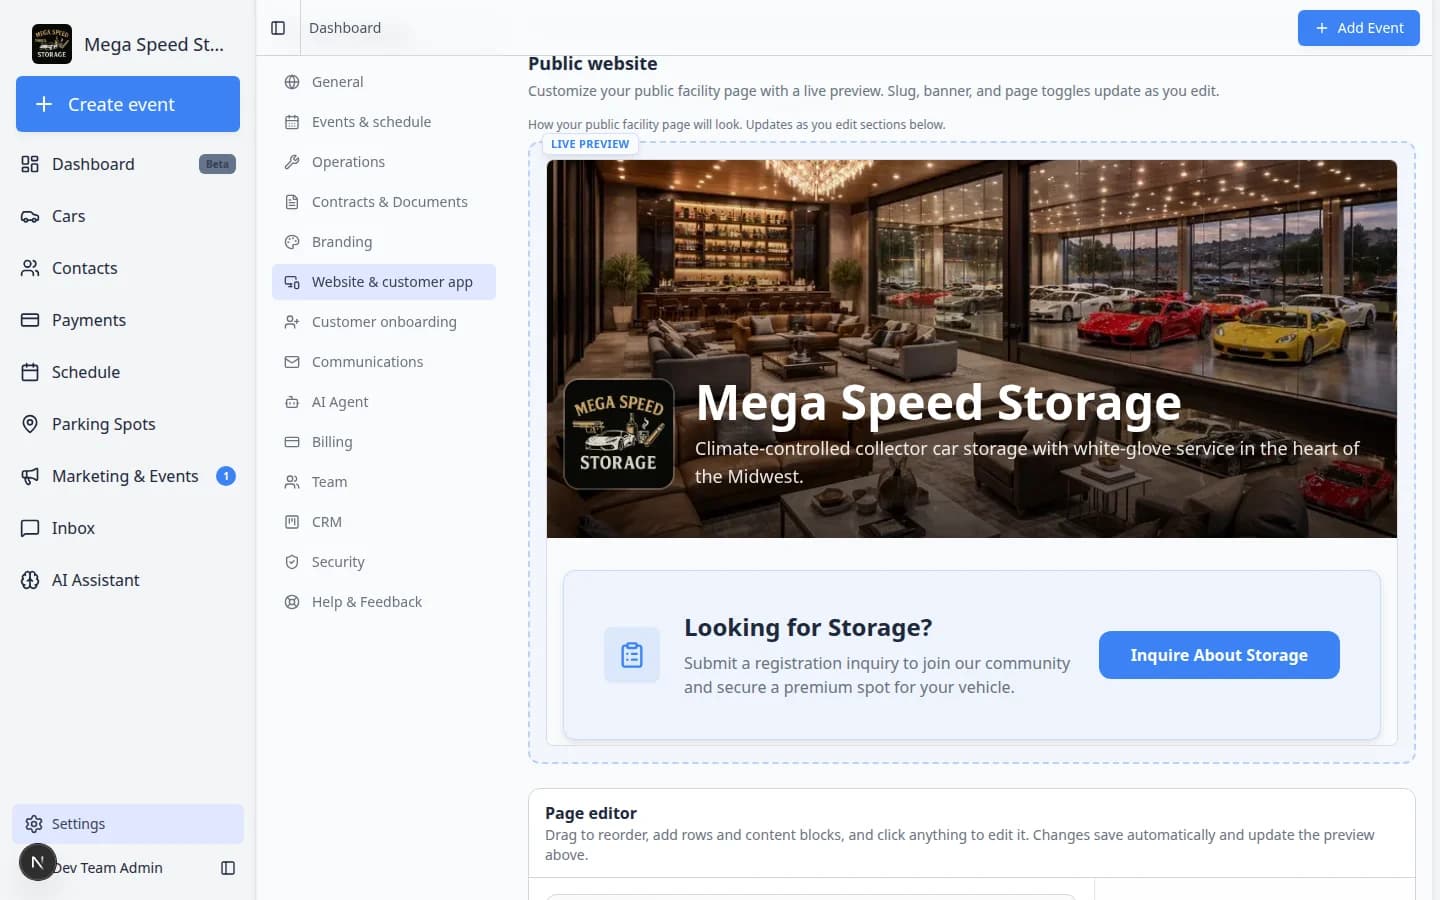
Step 2: Choose marketplace visibility
On the Marketplace section, choose who should be able to view listings.
- Customers only
Use this when only your facility customers should see the marketplace.
- All Car Storage Software users
Use this when any signed-in Car Storage Software user can view the marketplace.
- Public
Use this when anyone with the link can view the marketplace.
Step 3: Open the Marketplace dashboard
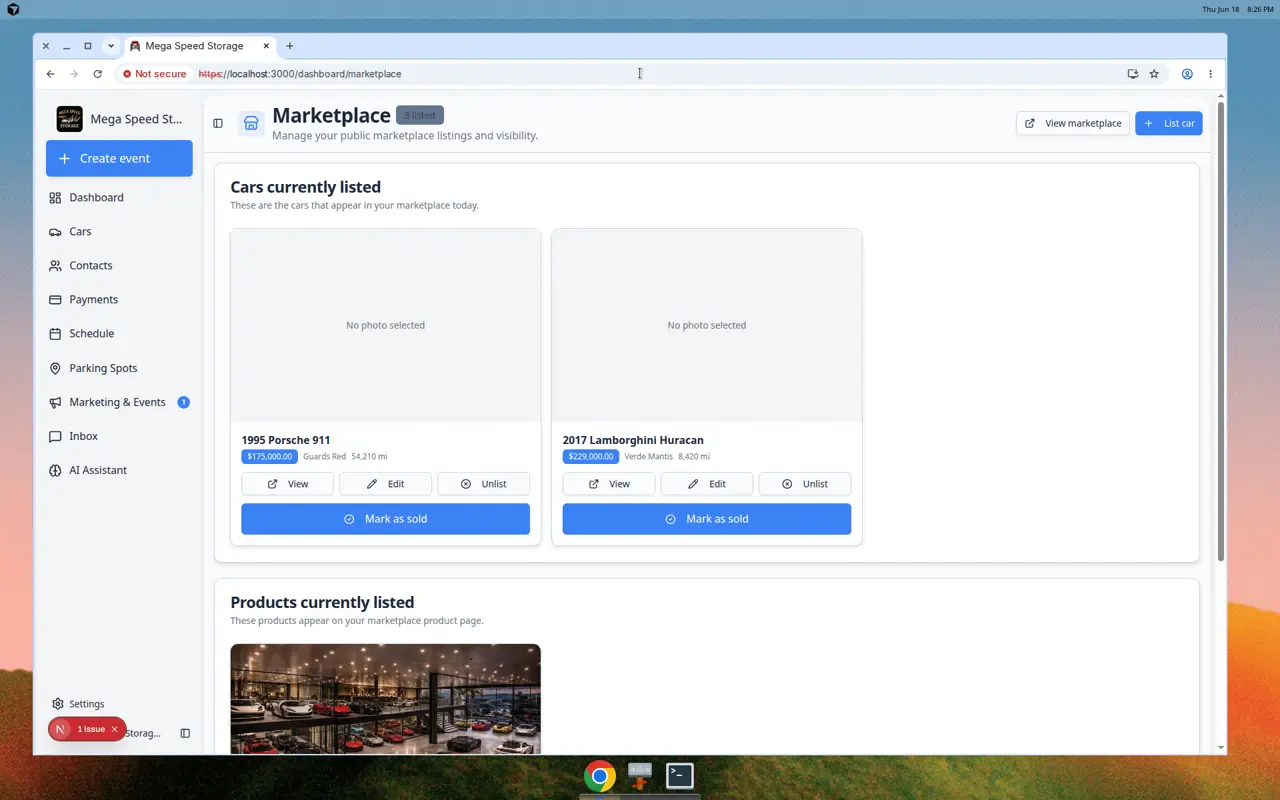
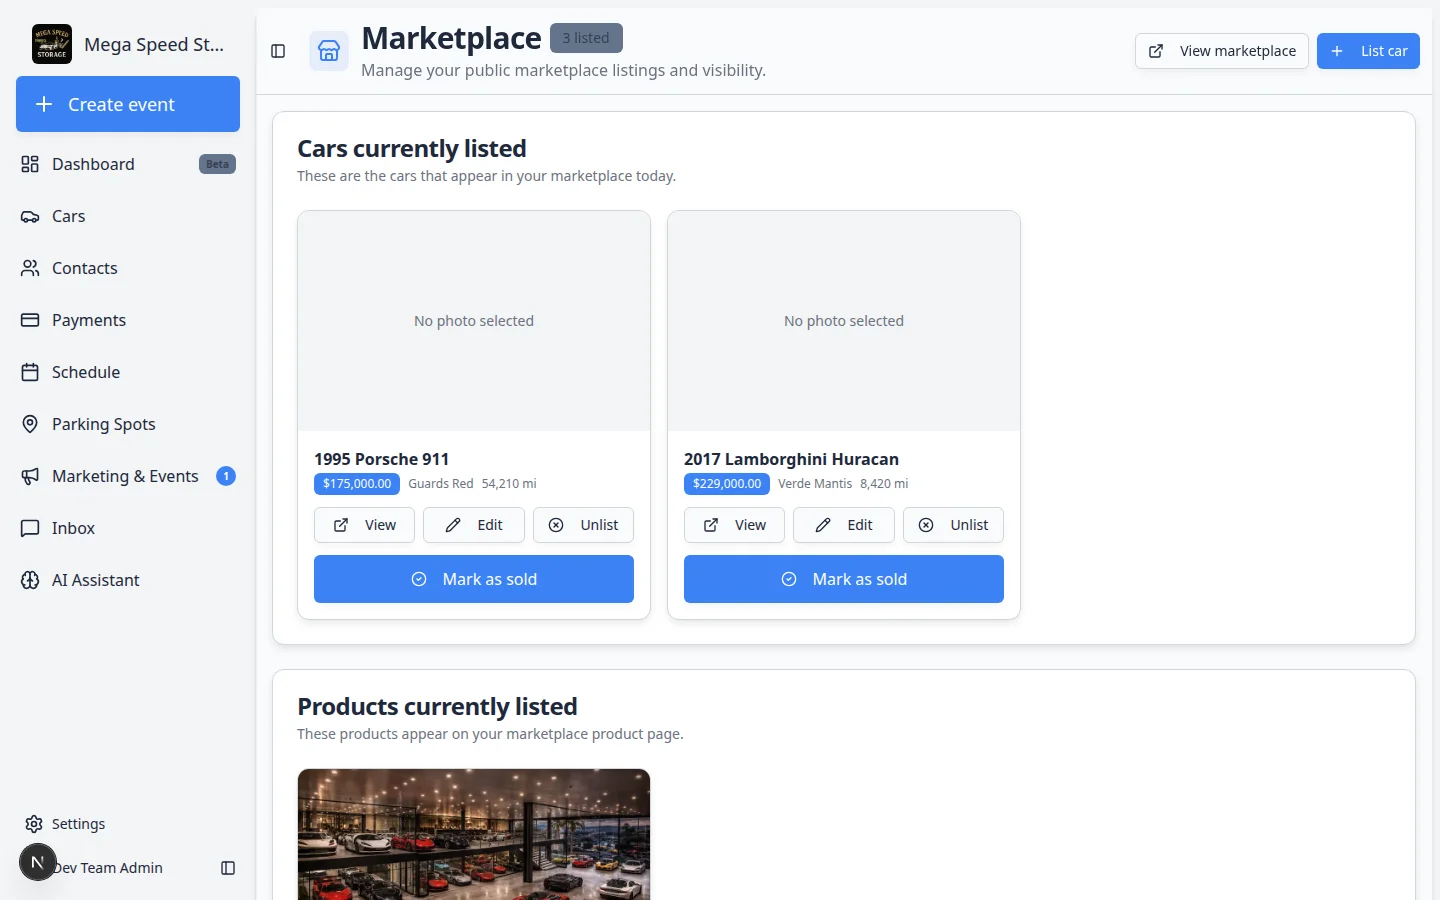
Go to Marketplace.
The Marketplace dashboard shows the items your team has made available. At the top you will see how many cars are listed and a View marketplace button to preview the public page.
- Review listed cars
Each card shows the vehicle name, price, color, and mileage. Use View to open the public listing, Edit to change details, or Unlist to remove a car from the marketplace.
- Review listed products
Scroll to Products currently listed for storage plans, services, and memberships. These come from Payments > Products and services.
- Click View marketplace
Open the public page in a new tab to see what shoppers see.
Expected result: Listed cars and products appear on the correct public marketplace URL.
Step 4: Publish a car listing
Use this flow when a vehicle should appear for sale or express interest.
- Open Marketplace and click List car
Go to Marketplace and click List car.
Why this matters: This is the fastest path to list a vehicle. You can also open a car in Cars and use for-sale settings on the car record.
- Select the vehicle
Search for the car by customer name, plate, or VIN. Pick the correct vehicle if the customer owns more than one.
- Add listing details
Add a clear description, asking price, and confirm photos look professional.
Click List for sale (or save) when the details are ready.
- Review on the public vehicle marketplace
Open
/facility/your-facility-name/marketplacein a private browser window and confirm the car appears.Expected result: The car shows on the vehicle marketplace with correct price and photos.
Step 5: Publish a product, service, or membership
Use this flow when customers should see a product, service, storage plan, or membership with online checkout.
- Open products and services
- Open the product or service
Choose the item customers should see.
- Review the customer-facing details
Confirm the name, description, price, billing schedule, and photo.
- Turn on Show on marketplace
Find Show on marketplace and turn it on. This is the switch that makes the item visible on
/marketplace/products. - Test checkout if customers can buy online
If the item can be purchased online, follow Test marketplace checkout before sharing the link.
Expected result
The product, service, or membership appears on the product marketplace where customers are allowed to view it.
Step 6: Open the public marketplace pages and review them
Open both marketplace URLs in a private browser window:
- Vehicle marketplace: add
/marketplaceto your Main page link - Product marketplace: add
/marketplace/productsto your Main page link
Check the pages as if you are a customer.
Review:
- Item names are clear.
- Descriptions explain what the customer gets.
- Prices are correct.
- Photos look professional and are not confusing.
- Buttons lead to the right next step (Express interest, Add to cart, or Checkout).
- Private items are not visible to the wrong audience.
Step 7: Test the customer action
If customers can buy products online, complete a test checkout with Test marketplace checkout.
If customers can express interest in a car, submit one test inquiry and confirm your team sees it in Contacts or Inbox.
Expected result
Your team knows what the customer sees and what your staff receives after the customer acts.
What success looks like
- Marketplace visibility matches your business rules.
- Every visible item has a clear name, description, price, and photo if needed.
- Checkout or interest forms have been tested.
- Your team knows where new purchases, requests, or leads will appear.
Troubleshooting
What to do next
After listings look correct, test checkout if customers can buy online. Then add the marketplace link to your public facility page or your existing website. If you need the marketplace on your own website domain, follow Connect a custom domain.