Events
Set closed days for events
Block holidays, facility closures, and service-specific blackout dates so customers do not book unavailable days.
What you will accomplish
You will block dates when your facility—or one specific service—should not accept new bookings.
Common examples include holidays, staff training days, facility maintenance, private events, severe weather closures, or any day your team cannot support appointments.
Closed days stop new customer bookings on those dates. They do not automatically cancel appointments that were already on Schedule.
There are two kinds of closed days—and a third tool that looks similar but works differently:
- Whole-shop closed days block bookings for the entire facility. You set these on Settings > General.
- Event-specific block out dates block one event type, while other event types can still be booked. You set these inside each event type's Scheduling section.
- Calendar Block (an event type) holds time on the staff calendar—it is not the same as a holiday closure. Staff use it for internal blocks; customers do not book it online.
Before you start
- Make sure you have admin access to Settings > General and Settings > Services & schedule.
- Know whether the closure affects the whole facility or only one service.
- Write a short reason, such as Thanksgiving, Detail bay maintenance, or Staff training.
- If appointments already exist on that date, review them before adding the closed day.
Add a whole-shop closed day
Whole-shop closed days are best when the entire facility is closed.
- Open General settings
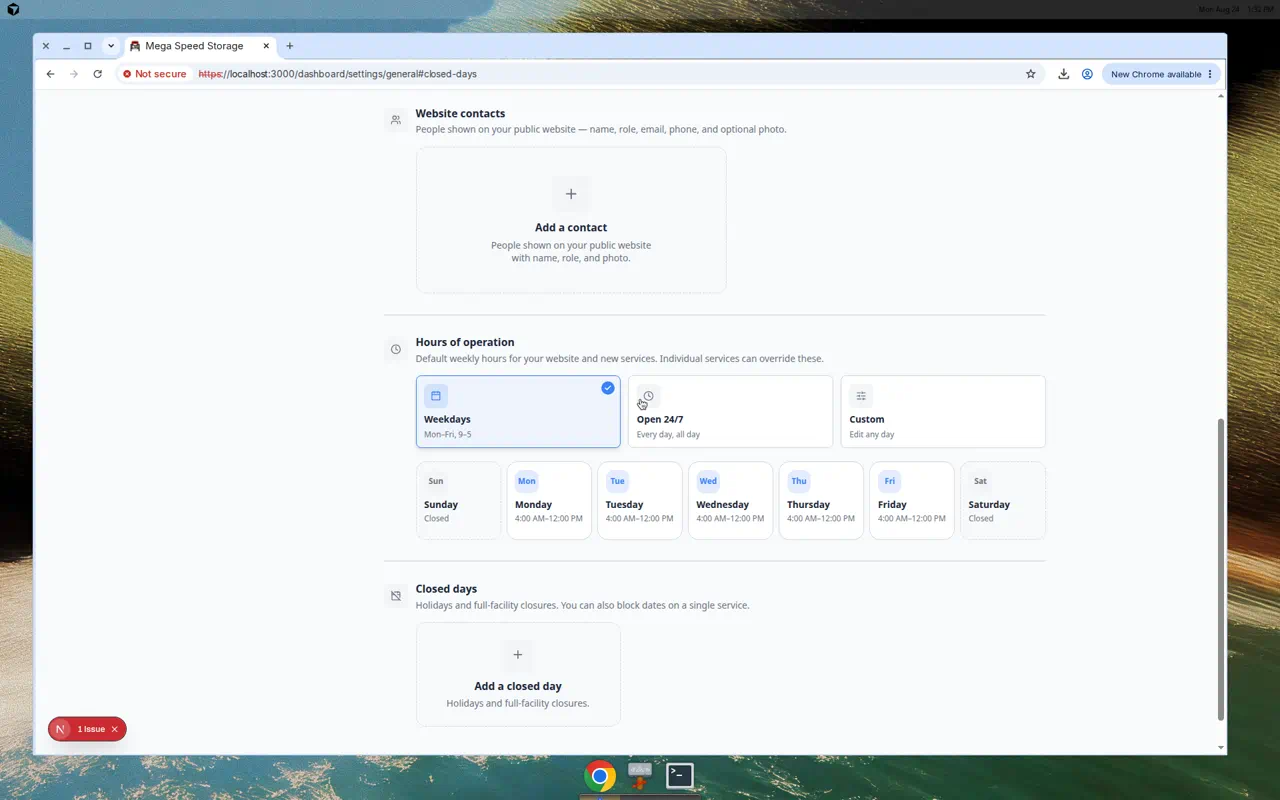
In the left sidebar, click Settings, then General. You can also go directly to Settings > General.
Scroll to Closed days.
Expected result: You see upcoming closure cards (if any) and a dashed Add a closed day tile.
- Click Add a closed day
Click the Add a closed day card.
Expected result: A dialog opens with a calendar and a reason field.
- Choose the date
Pick the date on the calendar.
You can only choose dates that are not already blocked.
- Add a reason
In Reason (optional), type a short note that explains the closure.
Examples: Christmas, Facility maintenance, or Team training.
Why this matters: A clear reason helps your team remember why the date was blocked months later.
- Save the closed day
Click Save or Add in the dialog.
Expected result: A new closure card appears in the Closed days list with the date and reason you typed.
Add a block out date for only one event type
Use this when one service is unavailable but the rest of the facility is open.
Example: Your detail bay is closed for maintenance, but vehicle pickup appointments are still allowed.
- Open the event type
Go to Settings > Services & schedule, find the event type card, and click Set up or Advanced.
Expected result: The event type editor opens.
- Scroll to Scheduling
Find the Scheduling section.
This is where the event type stores its own availability rules.
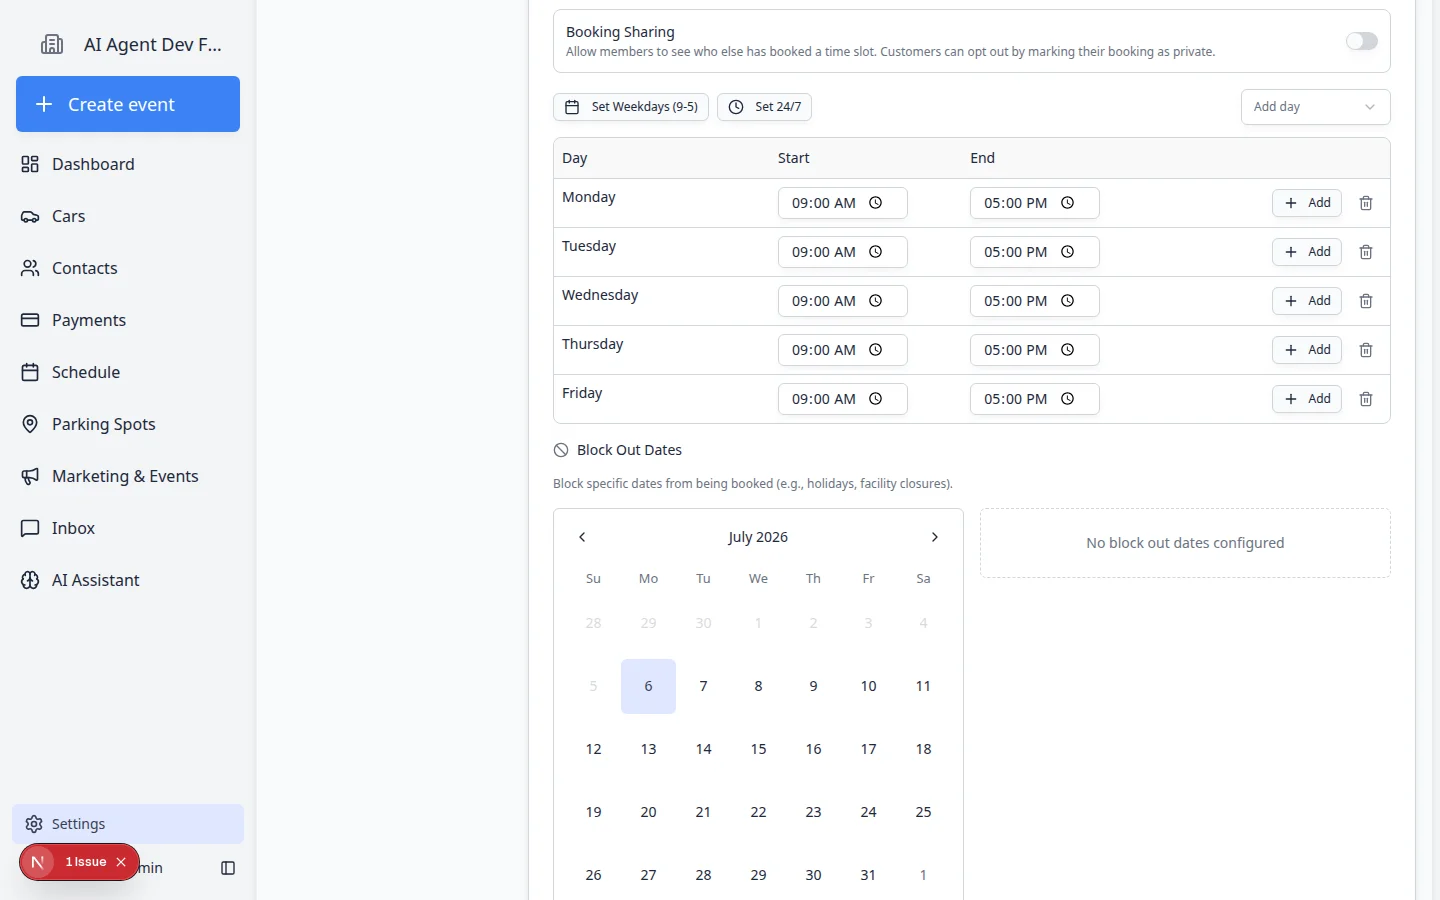
- Use Block Out Dates
In Scheduling, scroll to Block Out Dates.
Click the date on the small calendar, type a short reason (for example Detail bay maintenance), then click Add Block Out Date.
Expected result: The date shows in this event type's block out list. Other event types can still accept bookings on the same day if they are not blocked separately.
- Wait for changes to save
The editor saves automatically. Look for Saving… or Saved near the top of the page.
Expected result: The block out date applies the next time someone tries to book this event type.
- Verify on Schedule
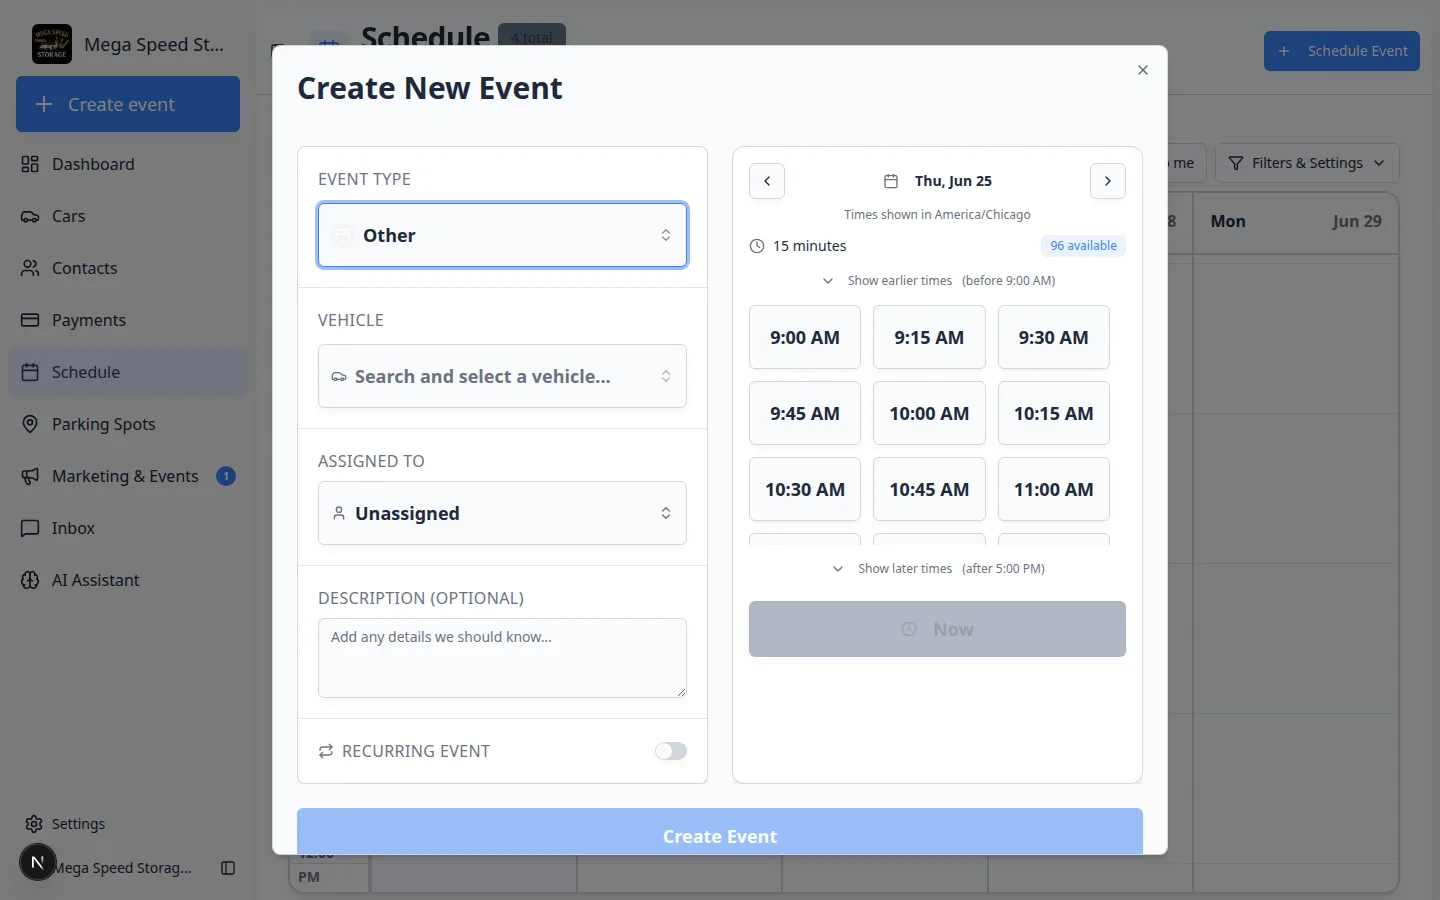
Open Schedule, click Schedule Event, choose this event type, and pick the blocked date on the calendar.
Expected result for customers: Online booking should show Unavailable or no open times on that date.
Expected result for staff: You may still see time slots because staff can override rules when a manager approves. Use Continue anyway only when you mean to book outside normal rules.
See closed days on the Schedule calendar
Your team can spot facility-wide closed days without opening Settings.
- Open Schedule
Go to Schedule.
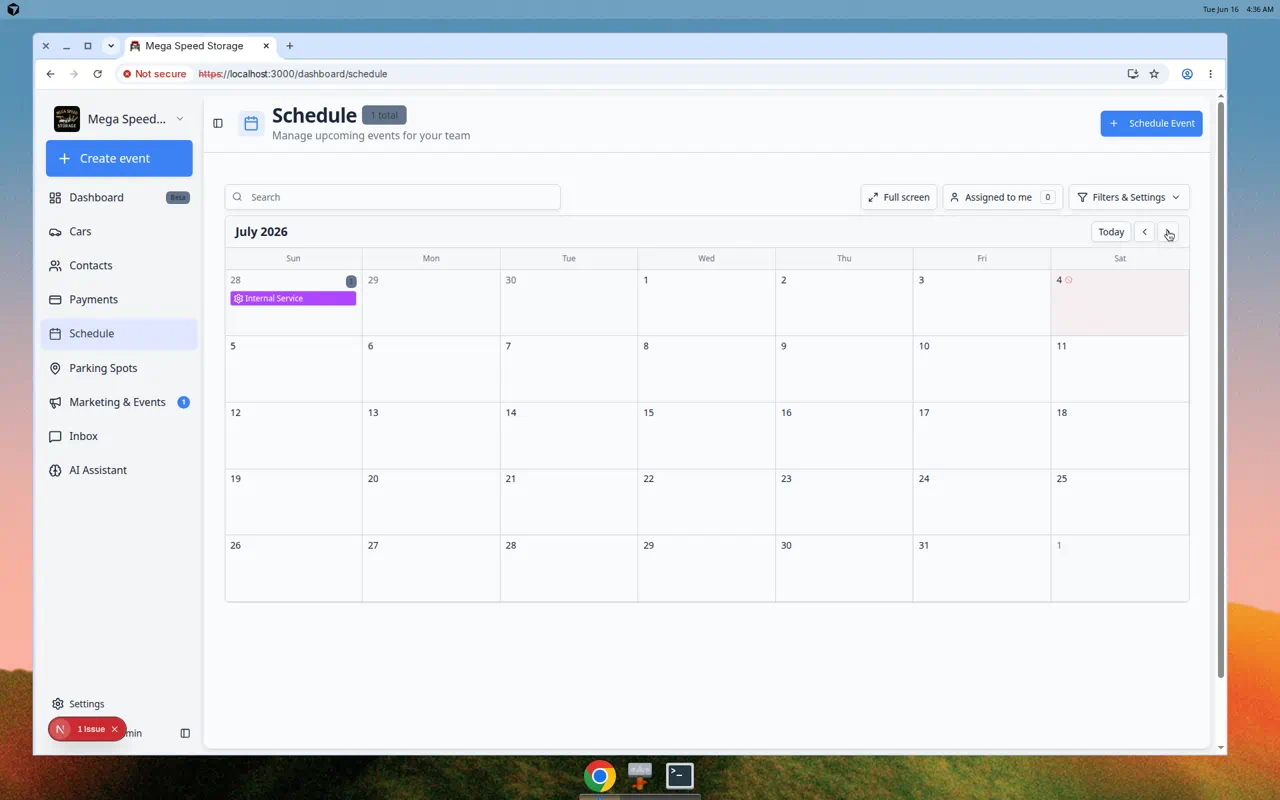
- Switch to Month view
Click Filters & Settings, choose Calendar under View Mode, then click Month. Move to the month that includes your closed day.
Expected result: Blocked dates may show a special marker or styling on the month grid so staff know bookings are limited that day.
- Compare with customer booking
If customers book online, test the same date from your public booking page. Customers should not be able to finish a booking on a whole-shop closed day.
Why this matters: The month view helps staff plan; the customer test confirms outsiders cannot book when you are closed.
Remove a closed day you no longer need
- Open General settings
Go to Settings > General for whole-shop closures—or open the event type editor for a service-specific block out.
- Find the closure card
Look in the Closed days list on General settings, or the event type's block out list.
Expected result: You see the date and reason you added earlier.
- Remove the block out
Click the remove or delete control on the closure card.
Expected result: The date disappears from the list and new customer bookings can use that day again—if your normal scheduling hours allow it.
Check existing appointments before closing a day
Closed days prevent new bookings, but your team should still check the schedule for appointments that were already created.
- Open Schedule
Go to Schedule.
- Go to the date you plan to close
Use the calendar controls to view that date.
- Review existing appointments
Look for customer visits, pickups, deliveries, service work, or internal tasks.
- Reschedule or cancel if needed
If the closure affects an existing appointment, update it before relying on the closed day.
For help, see Update, assign, or reschedule an event or Cancel or delete a scheduled event.
What success looks like
After setup:
- The closed date appears in the closure list on General settings (or in the event type's block out list).
- Customers cannot choose that date for affected bookings.
- Staff understand why the date is closed because the reason is clear.
- Existing appointments were reviewed and handled separately if needed.
Common mistakes to avoid
- Do not use a whole-shop closed day when only one service is unavailable.
- Do not assume closed days cancel existing appointments. Review the Schedule page.
- Do not leave the reason blank if your team may forget why the date was blocked.
- Do not block a past date unless you are cleaning up records. It will not help future booking availability.
Troubleshooting
What to do next
After closed days are set, review Configure scheduling and booking options to make sure normal available days and hours are correct. Then run Test an event setup on both an open day and a closed day.
If you also manage recurring care for stored vehicles, return to Set up service plans after your calendar rules look right.