Payments
Manage recurring billing
Set up and monitor repeat charges for storage, memberships, service plans, or other ongoing billing.
What you will accomplish
You will set up recurring billing so the same charge happens again on a schedule—without creating a new invoice by hand every month.
Common examples include monthly storage, quarterly service plans, annual memberships, and other repeat charges.
Recurring billing helps your team avoid missed charges and reduces manual work. You set the plan once, then monitor it on Payments > Recurring.
Before you start
- Make sure the customer already exists in Contacts.
- Create the recurring product first in Products & Services.
- Add at least one pricing variant on that product (for example monthly_standard at $500/month). Without a variant, the Add recurring window cannot show a price. See Manage products and services.
- Know the price, billing schedule, start date, and quantity.
- Confirm whether the customer has a saved payment method or should receive a payment request.
- Ask a manager if you are unsure whether the customer should be charged in advance or after the service period.
Open the Recurring page
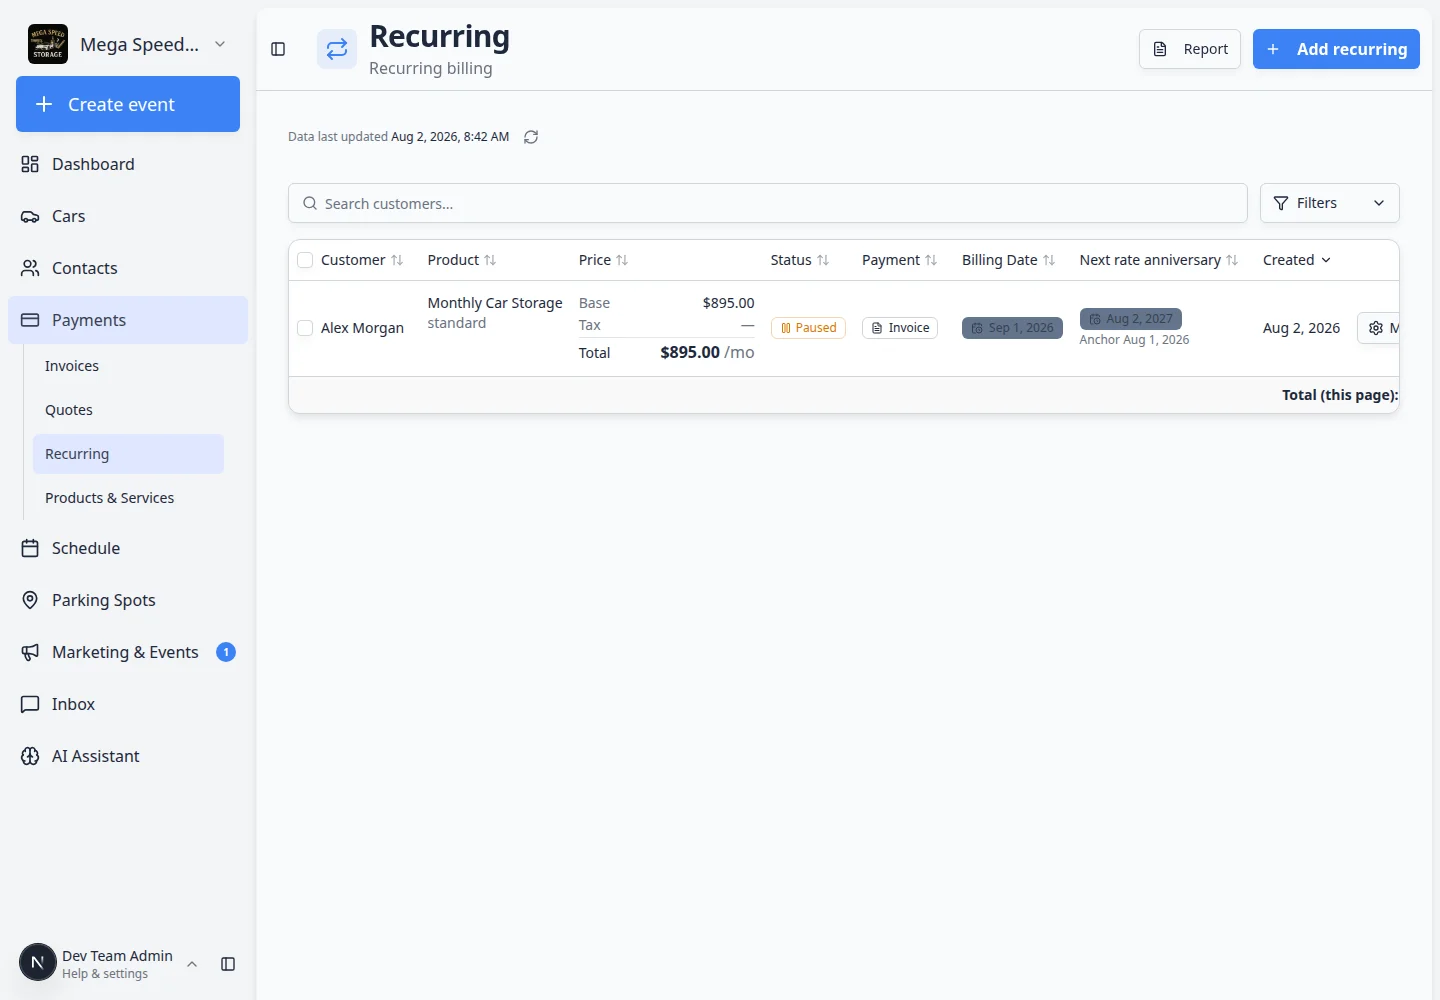
Go to Payments > Recurring.
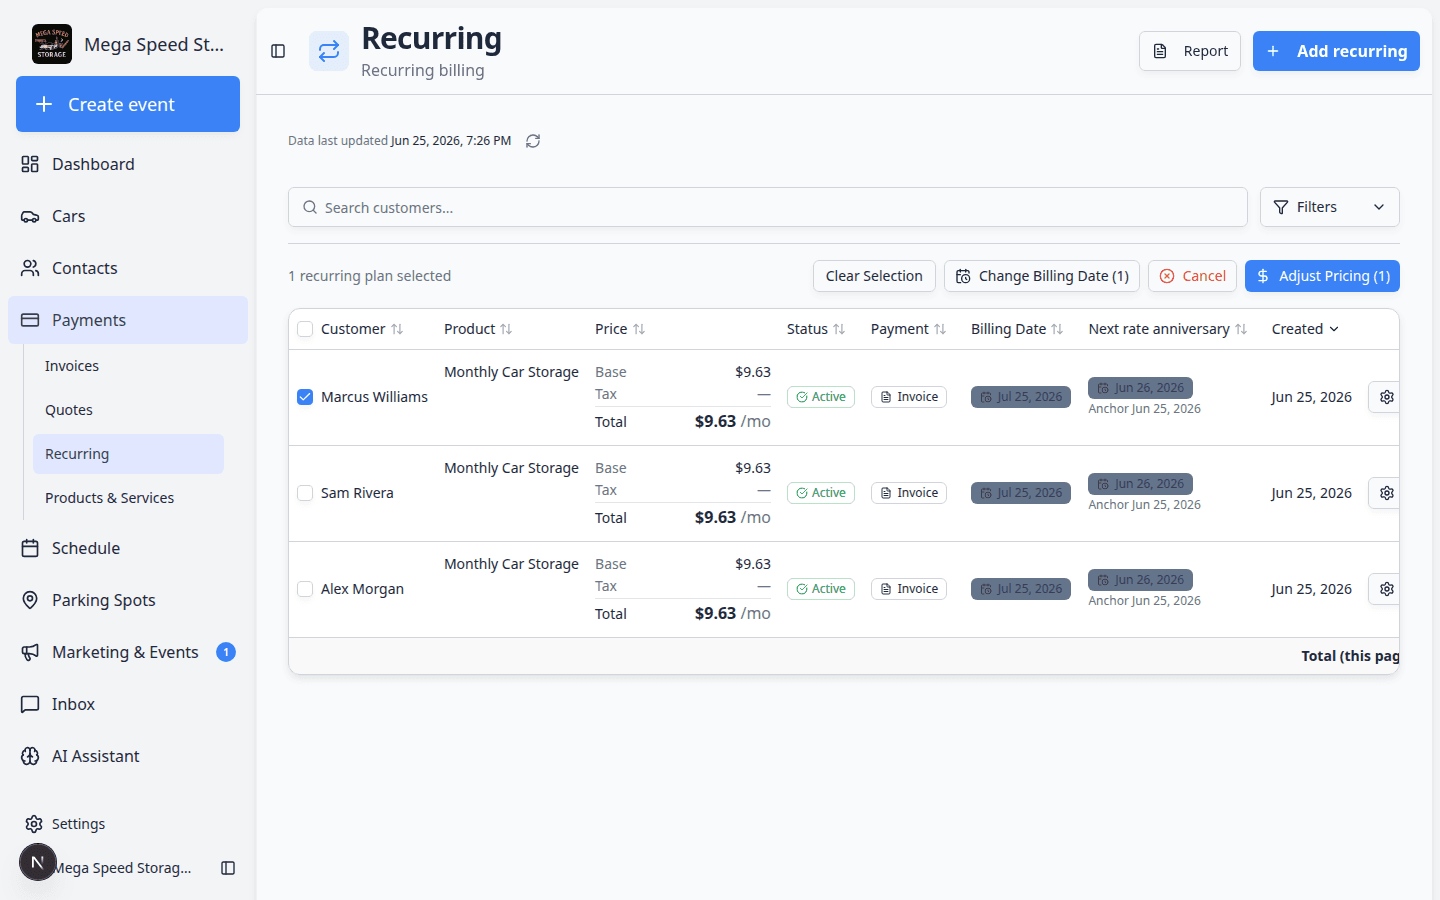
This page shows active, paused, future, and canceled recurring plans. You can also open the recurring revenue report from this page.
Understand the Add recurring window
The Add recurring window collects everything needed to bill on a schedule. Read each section before you save.
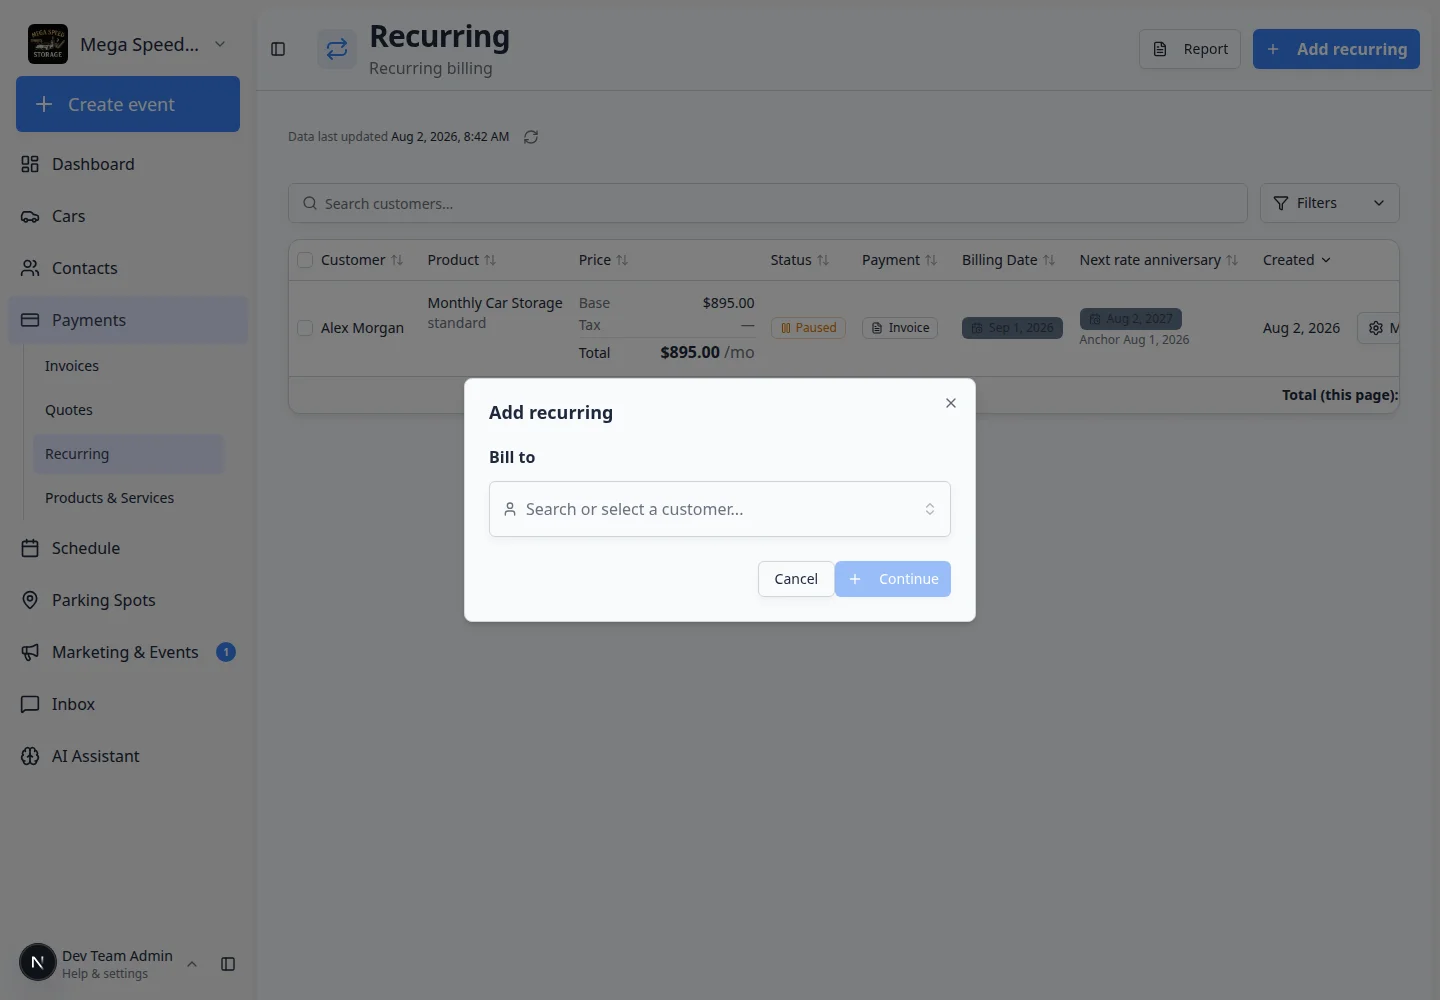
Customer — Who will be billed. Search by name or company.
Product / plan — The recurring item from Products & Services.
Price — The pricing variant (for example monthly_standard). If this dropdown is empty, add a variant on the product first.
Payment method — How the customer pays: saved card, invoice, or another option your facility allows.
Billing action — Whether to charge automatically, send an invoice, or wait for the customer to add a payment method.
Start date — When the schedule begins. This affects the first Next billing date on the list.
Add a recurring charge
- Click Add recurring
In the top-right area of the Recurring page, click Add recurring.
- Choose the customer
Search for the customer who should receive the recurring charge. Pick the correct customer before selecting the product.
- Choose the recurring product
Select the product or service the customer should be billed for, such as Monthly Climate Controlled Storage or Collectors Club Membership.
If the product is missing, create it first in Products & Services.
- Choose the price option
Select the pricing variant for this customer, such as monthly_standard.
The amount shown may be slightly higher than the base price if your facility passes card or platform fees to customers.
If no prices appear, open the product in Products & Services and add a variant first.
- Set the start date
Choose when the recurring plan should begin. If the customer should be charged right away, use the current date or the default start option.
- Choose the payment behavior
Select whether the system should use a saved payment method, send the customer an invoice, or request a payment preference.
If you are unsure, ask your billing manager which option your facility uses.
- Review and save
Check the customer, product, price, start date, and next billing date. Save only when the plan matches the agreement with the customer.
Expected outcome: The new plan appears on the Recurring list with a status such as Active or Future, and a Next billing date your team can track.
What success looks like
After you save the recurring plan:
- The plan appears on the Recurring page.
- The status shows whether the plan is active, paused, incomplete, future-dated, or canceled.
- The next billing date shows when the next invoice or payment should happen.
- Your team can open the plan later to pause, resume, update payment details, or review billing history.
Update billing dates for several customers at once
When your manager approves moving many recurring plans to the same billing day (for example aligning storage to the 1st of the month):
- Open Recurring
Go to Payments > Recurring.
- Select the plans to change
Use the checkboxes on the left side of the table to select the recurring plans you need to update.
Expected result: A bulk action bar appears when at least one row is selected.
- Choose the bulk billing-date action
Follow the on-screen bulk action to change billing date for the selected plans. Confirm each step carefully—the change affects every selected customer.
Why this matters: Bulk updates save time versus opening Manage on dozens of rows one by one.
Open the recurring revenue report
When you need a big-picture view of scheduled income:
- Open Recurring
Go to Payments > Recurring.
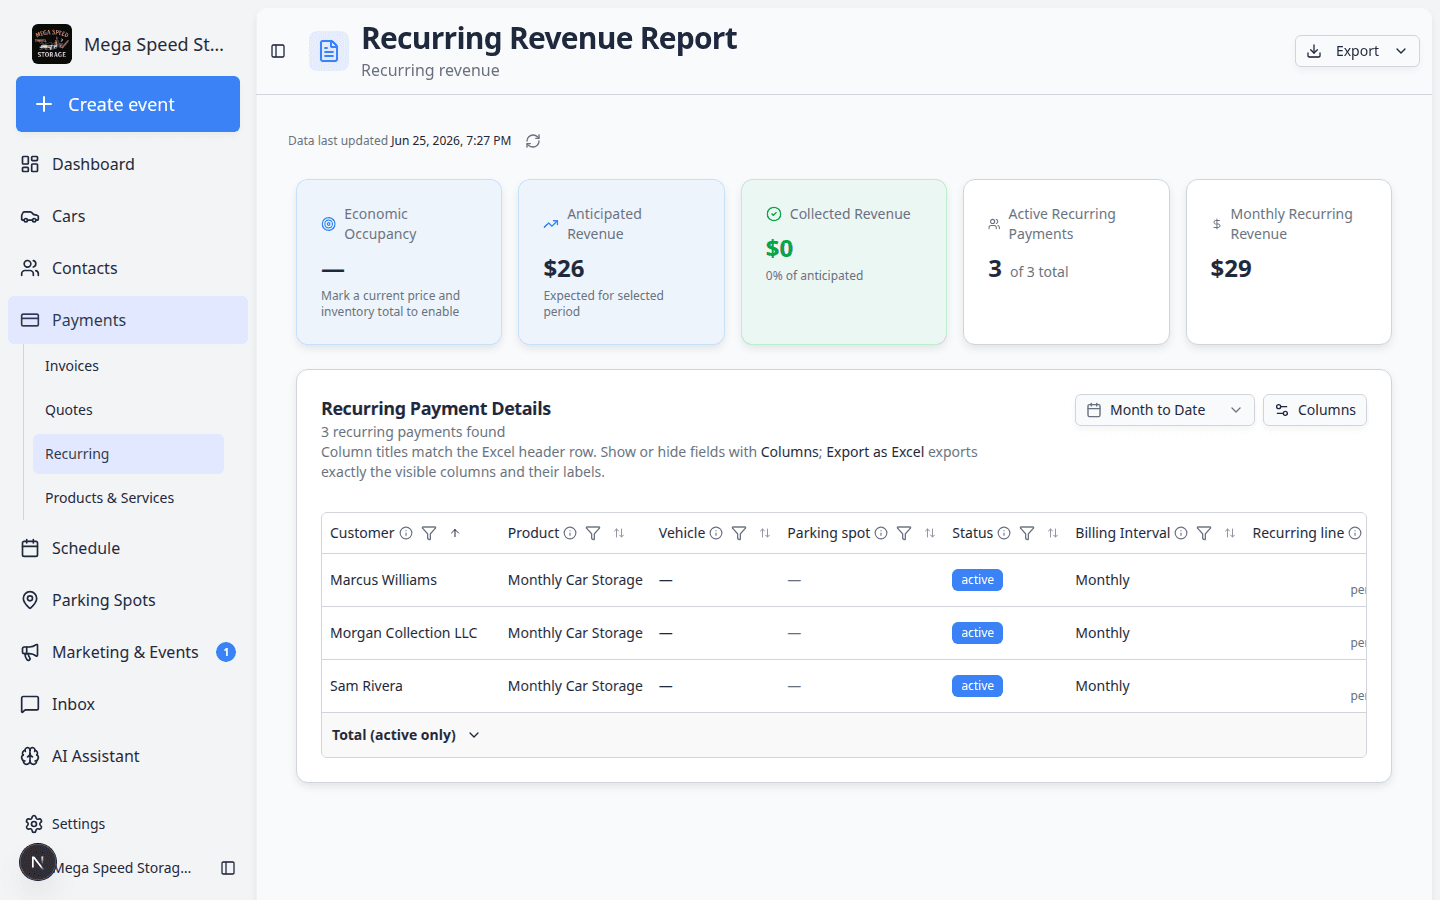
- Click Report
In the top-right area, click Report.
Expected result: The Recurring Revenue Report opens. You can review upcoming recurring charges and export to Excel if your team needs a spreadsheet.
Recurring billing terms in plain English
Billing schedule means how often the customer is charged, such as monthly or yearly.
Start date means when the recurring plan begins.
Next billing date means the next date the customer should be billed.
Payment method means how the customer pays, such as a card, bank account, invoice, cash, or check.
Paused means the recurring plan is stopped for now but not deleted.
Common mistakes to avoid
- Do not create a recurring plan for a one-time service. Use Invoices instead.
- Do not choose the wrong price option. Monthly, annual, and custom options can look similar.
- Do not leave the start date unchecked. A wrong start date can bill too early or too late.
- Do not assume the customer has a saved payment method. Check before choosing automatic payment.
Troubleshooting
Pause, resume, or cancel an existing plan
Use these steps when a customer's storage ends, they pause membership, or pricing changes.
- Open Recurring
Go to Payments > Recurring.
- Find the customer's plan
Search or scroll to the correct customer and product name.
Expected result: You see the plan status (for example Active, Paused, or Canceled) and the Next billing date.
- Click Manage
Click Manage on that row.
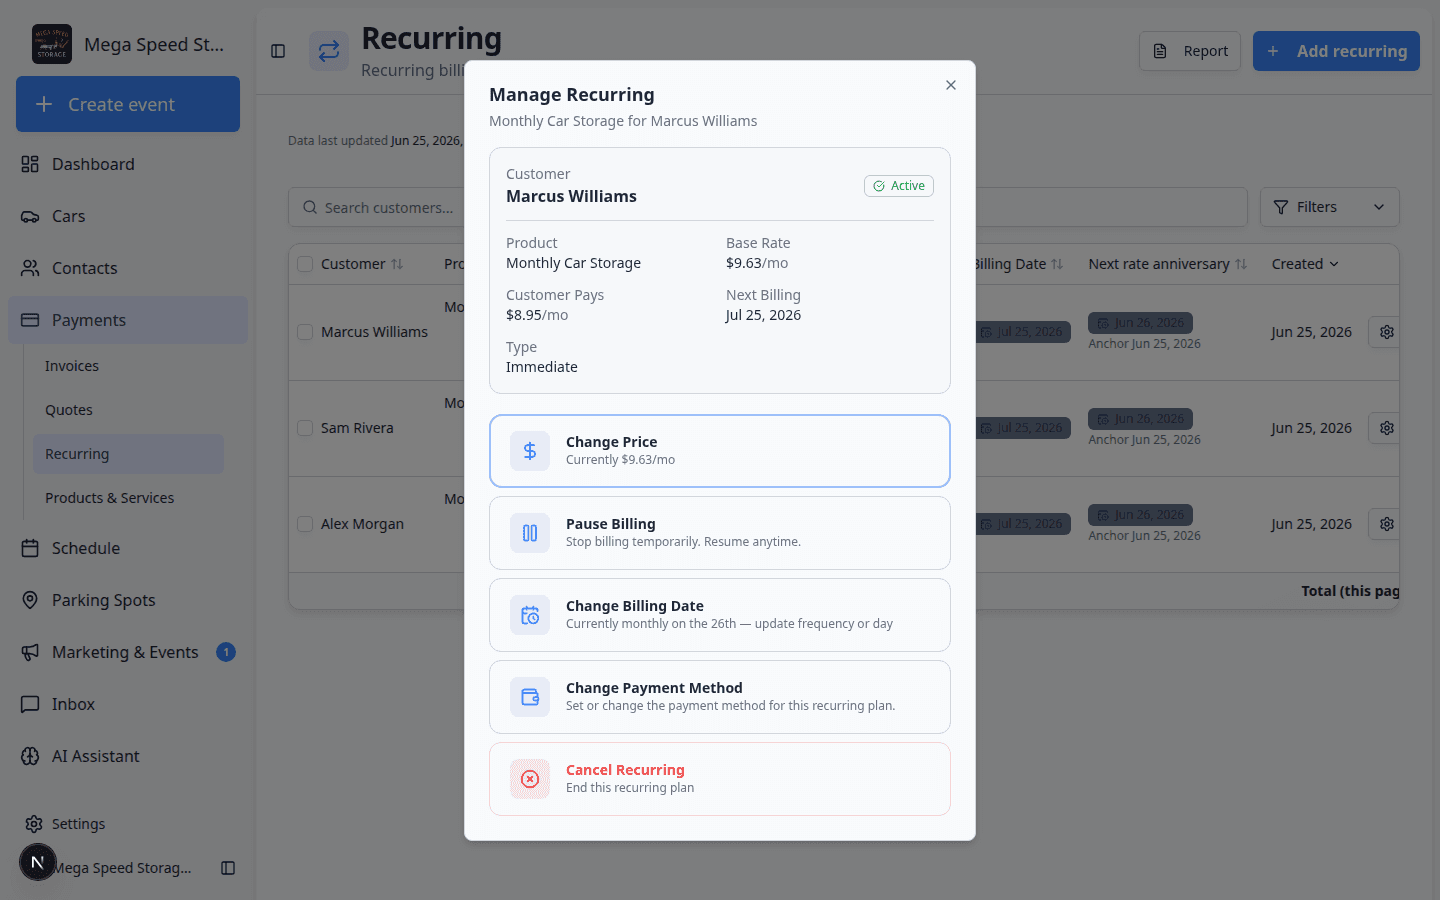
Expected result: A window titled Manage Recurring opens. It shows the customer, product, current price, payment method, and next billing date at the top.
Choose an action in Manage Recurring
The Manage Recurring window lists large action buttons. Pick the one that matches what the customer asked for:
Change Price (or Change Price & Quantity) — Update the amount when your manager approved new pricing. You may also change quantity when the product bills per vehicle.
Pause Billing (or Pause Units) — Stop charges temporarily. The customer may return later. You can pause immediately or at the end of the current billing period.
Resume Billing — Appears when a plan is already paused. Restarts billing on the next cycle.
Change Billing Date — Move when the customer is charged each month or year.
Change Payment Method — Switch between card, bank account, invoice, cash, or check when your facility allows it.
Cancel Recurring (or Cancel / Reduce) — End the plan when the customer is leaving or reducing vehicles on the plan.
- Pause billing temporarily
Click Pause Billing. Choose whether to pause now or at the end of the current period.
Why this matters: Pausing now stops the next charge right away. Pausing at period end lets the customer finish the time they already paid for.
Expected result: The Recurring list shows Paused until you resume.
- Resume after a pause
Open Manage on a paused plan and click Resume Billing.
Expected result: Status returns to Active and the Next billing date updates.
- Cancel when the customer is done
Click Cancel Recurring. Follow the prompts to cancel at the end of the period, immediately, or on a specific date—depending on what your facility allows.
Why this matters: Canceling stops future automatic charges. It does not automatically refund past payments.
Expected result: The plan status shows Canceled on the Recurring list.
- Change price when approved
Click Change Price, pick the new price option (or enter the new amount), and save.
Expected result: The amount on the Recurring row updates. Confirm with the customer if your facility policy requires it.
Update many recurring plans at once (bulk actions)
Use bulk actions when your manager approves a facility-wide price change or when several customers need the same billing date moved—not when you are fixing one person's plan.
Select plans on the Recurring list
- Open Recurring
Go to Payments > Recurring.
- Use the checkboxes on the left
Click the checkbox on each row you want to include. You can select up to 10 active plans at a time.
Why this matters: The bulk tools are built for small batches so your team can review each change carefully.
- Look for the bulk action bar
After you select at least one plan, a bar appears above the table with buttons such as Update Prices, Change Billing Date, Cancel Selected, and Resume Selected (when paused plans are selected).
Expected result: You see how many plans are selected and which bulk actions are available.
Bulk update prices
Use this when approved storage rates change for many customers on the same product.
- Select plans on the same product
On Payments > Recurring, check the boxes for the customers who should get the new price. All selected plans should be for the same recurring product (for example Monthly Car Storage).
- Click Update Prices
Click Update Prices in the bulk action bar.
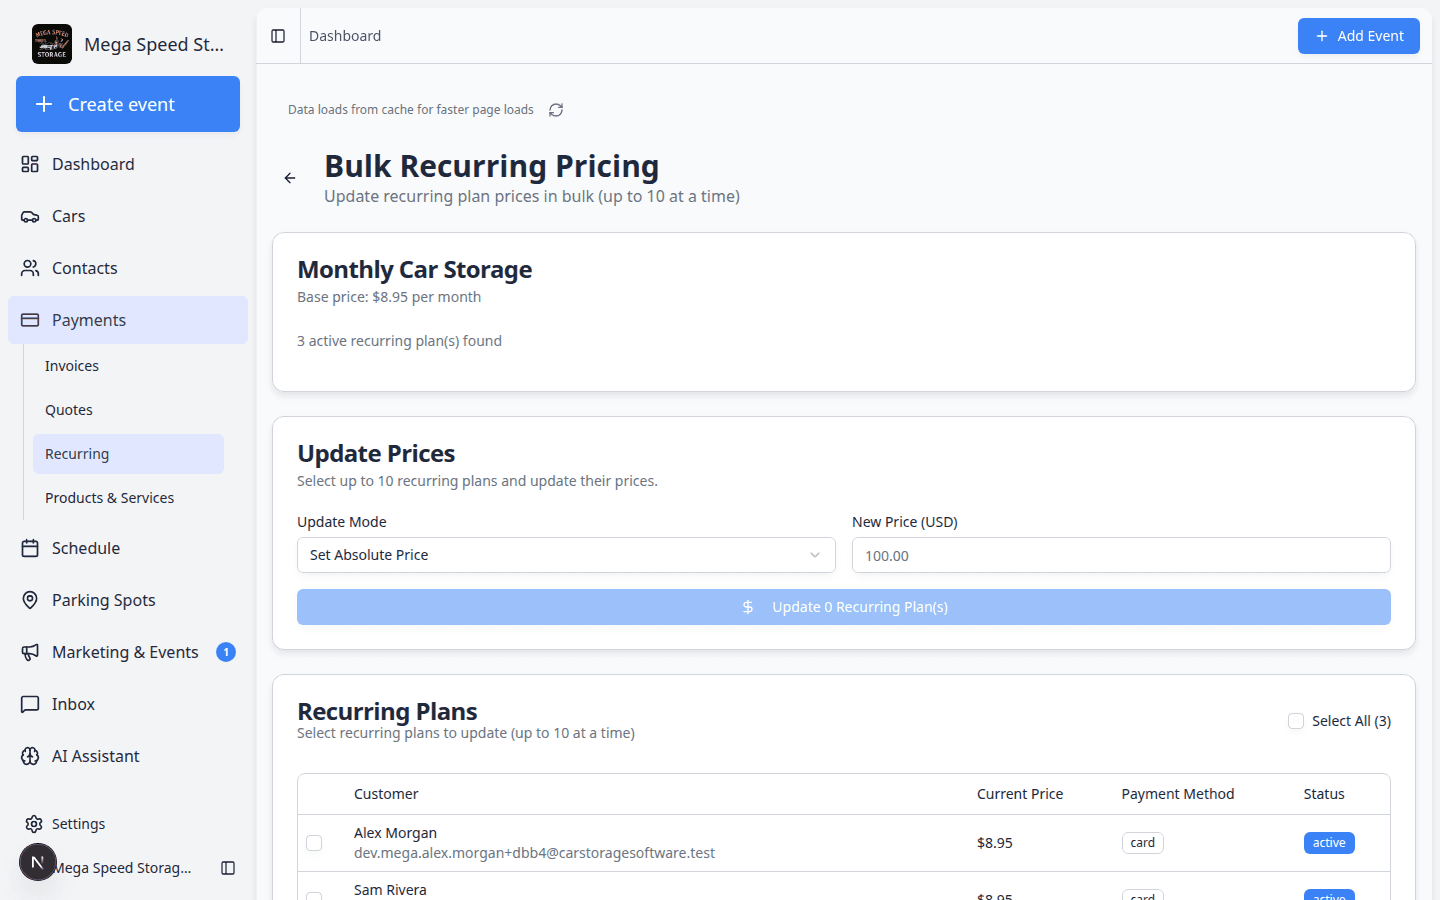
Expected result: You land on Bulk Recurring Pricing (or a dialog that opens the same workflow).
- Choose how to change the price
Pick an Update Mode:
- Set Absolute Price — enter the new dollar amount every selected customer should pay (net, before card fees).
- Percentage Change — enter a percent increase or decrease (for example
5for a 5% increase). - Select Existing Price — pick a pricing variant you already created under Products & Services.
Why this matters: Select Existing Price is safest when your team already set up the new rate as a product variant. Percentage Change is common for annual increases.
- Review the preview
The page shows a Preview for the first few customers: old price → new price.
Read every line. If one customer looks wrong, go back and uncheck that row.
- Click Update
Click Update [N] Recurring Plan(s) when the preview matches your manager's approval.
Expected result: A success message shows how many plans updated. Failed rows (if any) are listed so you can fix them one at a time with Manage.
Bulk change billing dates
Use this when several customers should bill on the same day of the month (for example the 1st) instead of scattered dates.
- Select the plans to move
On Payments > Recurring, check up to 10 plans that should share a new billing date.
- Click Change Billing Date
Click Change Billing Date in the bulk action bar.
Expected result: The Bulk Billing Date page opens with the plans you selected grouped by billing frequency (monthly, yearly, and so on).
- Set the new anchor day for each group
For each group, choose the billing day (such as the 1st or 15th) and whether the change should happen now or at the end of the current period.
Why this matters: Moving to end of period avoids surprising a customer with two charges close together.
- Review the timeline preview
Read the preview that shows upcoming invoice dates before you apply the change.
- Apply the change
Confirm when the preview looks correct.
Expected result: The Next billing date column on Recurring updates for each included plan.
Bulk cancel or resume
- Cancel Selected — ends multiple plans when a group of customers is leaving storage at once. Read each prompt; canceling cannot always be undone.
- Resume Selected — appears when you select paused plans. Use it after a seasonal pause when those customers are returning.
What to do next
After creating a recurring plan, check the Recurring page regularly. Use the Report button to review recurring revenue and make sure expected storage or membership income is being tracked.
If you are adding your first plan, see the Add recurring window for customer, product, price, and start date fields: