Events
Configure event types
Set up the appointment and workflow types your facility schedules most often.
What you will accomplish
You will create or update an event type—a reusable name and rules for one kind of work your facility does, such as Storage Intake, Vehicle Pickup, Detail Appointment, Maintenance, or Customer Tour.
When you finish, staff can choose that event from Schedule or a car record, and customers can request it from your portal or website (if you turn on customer access).
This guide covers the first setup screen: name, description, who can use the event, and which workflow features are required. Scheduling hours, booking options, messages, photos, and resources have their own guides linked at the end.
Before you start
- Confirm you have admin access. Most event type settings are managed from Settings > Services & schedule.
- Write down the service or workflow name customers and staff will understand.
- Decide whether customers should be able to book this event themselves.
- Know the usual appointment length, availability, and reminder needs.
- If the event needs photos or resources, you can add those during setup or come back later.
Open Services & schedule
Go to Settings > Services & schedule.
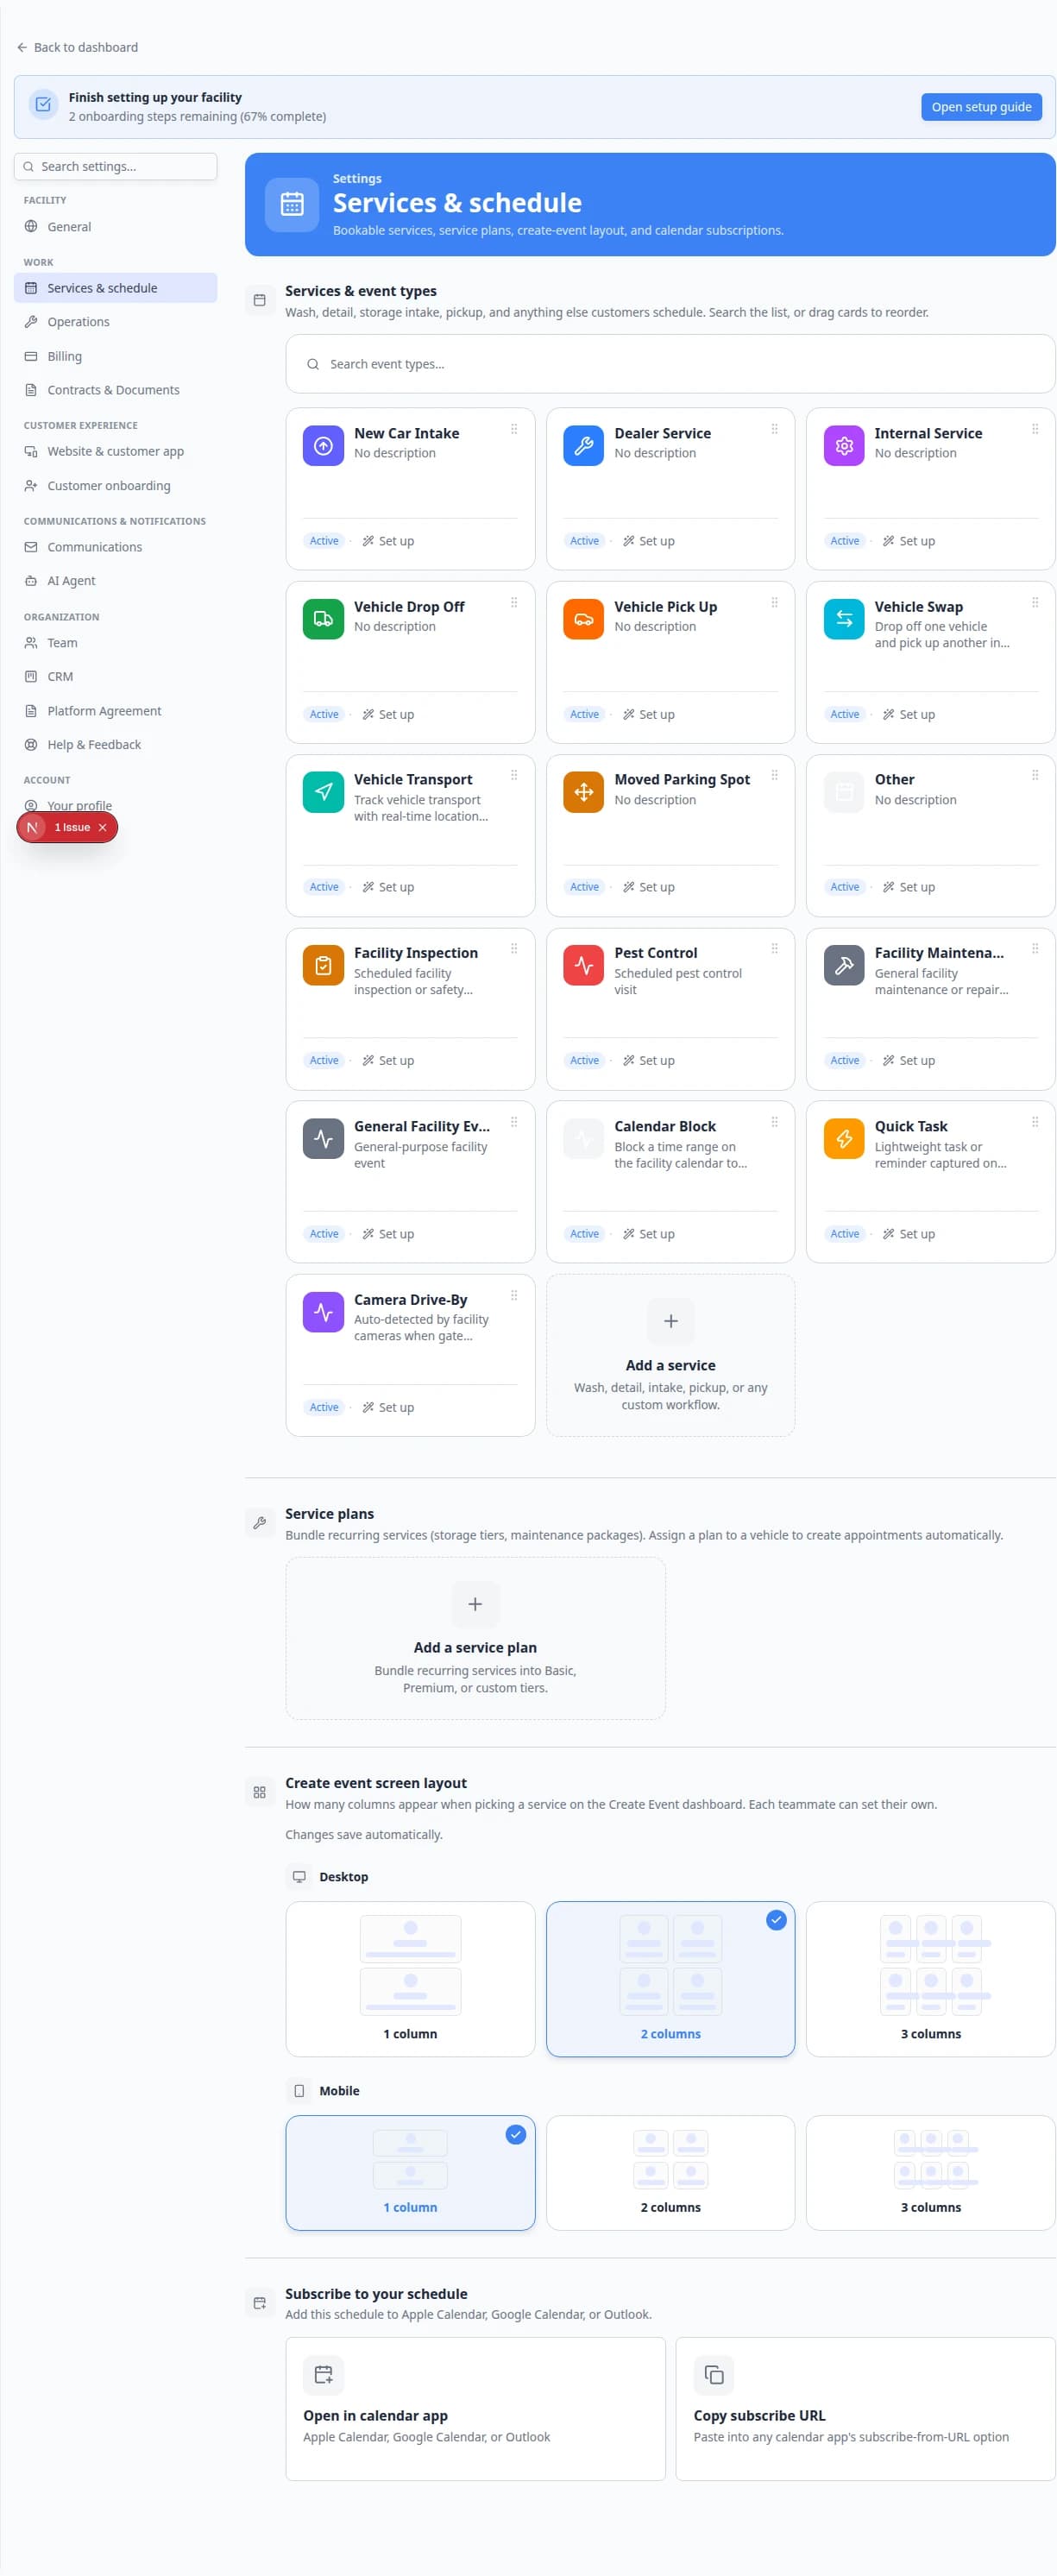
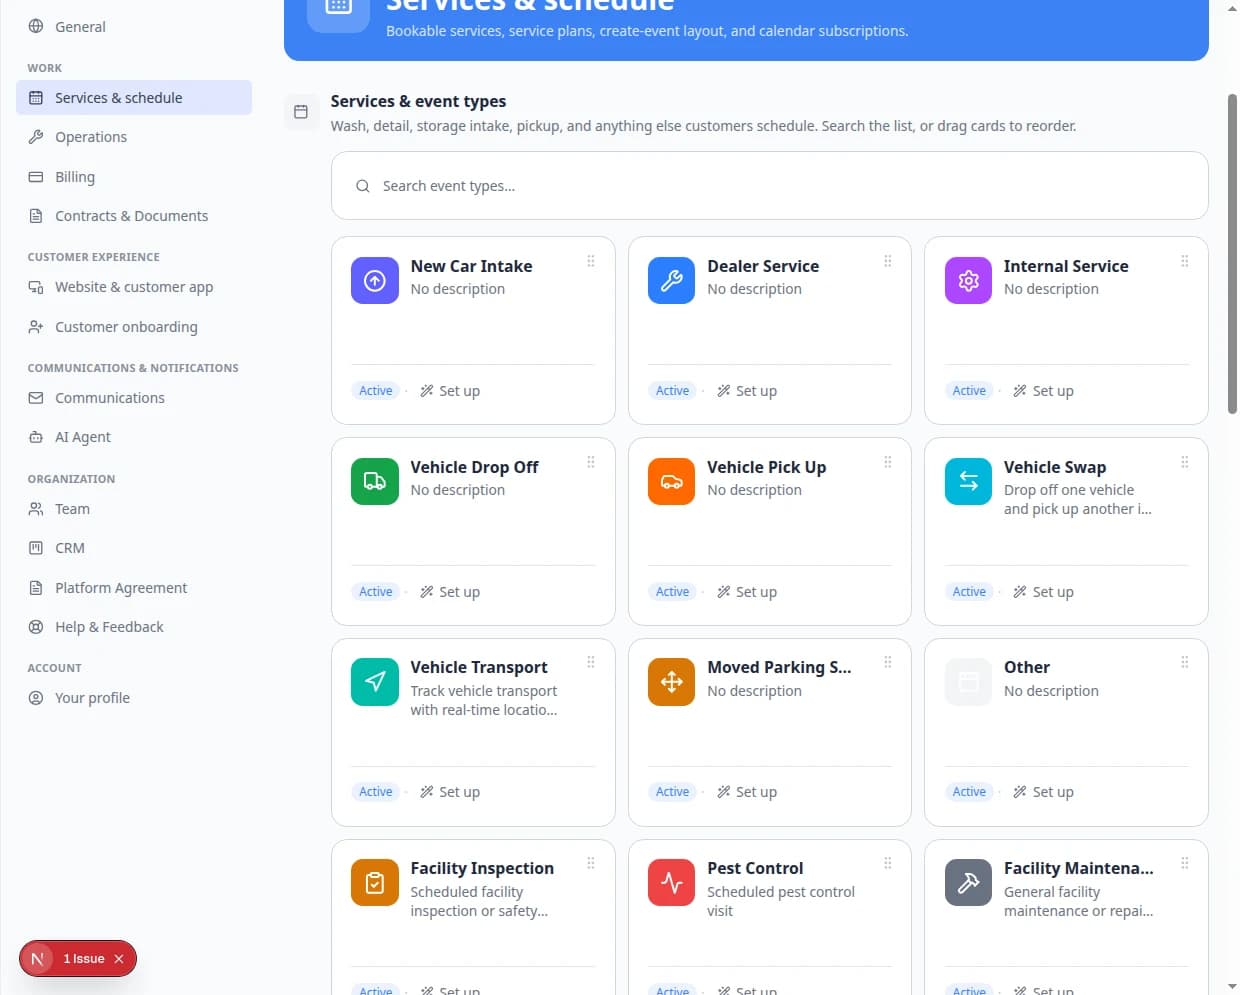
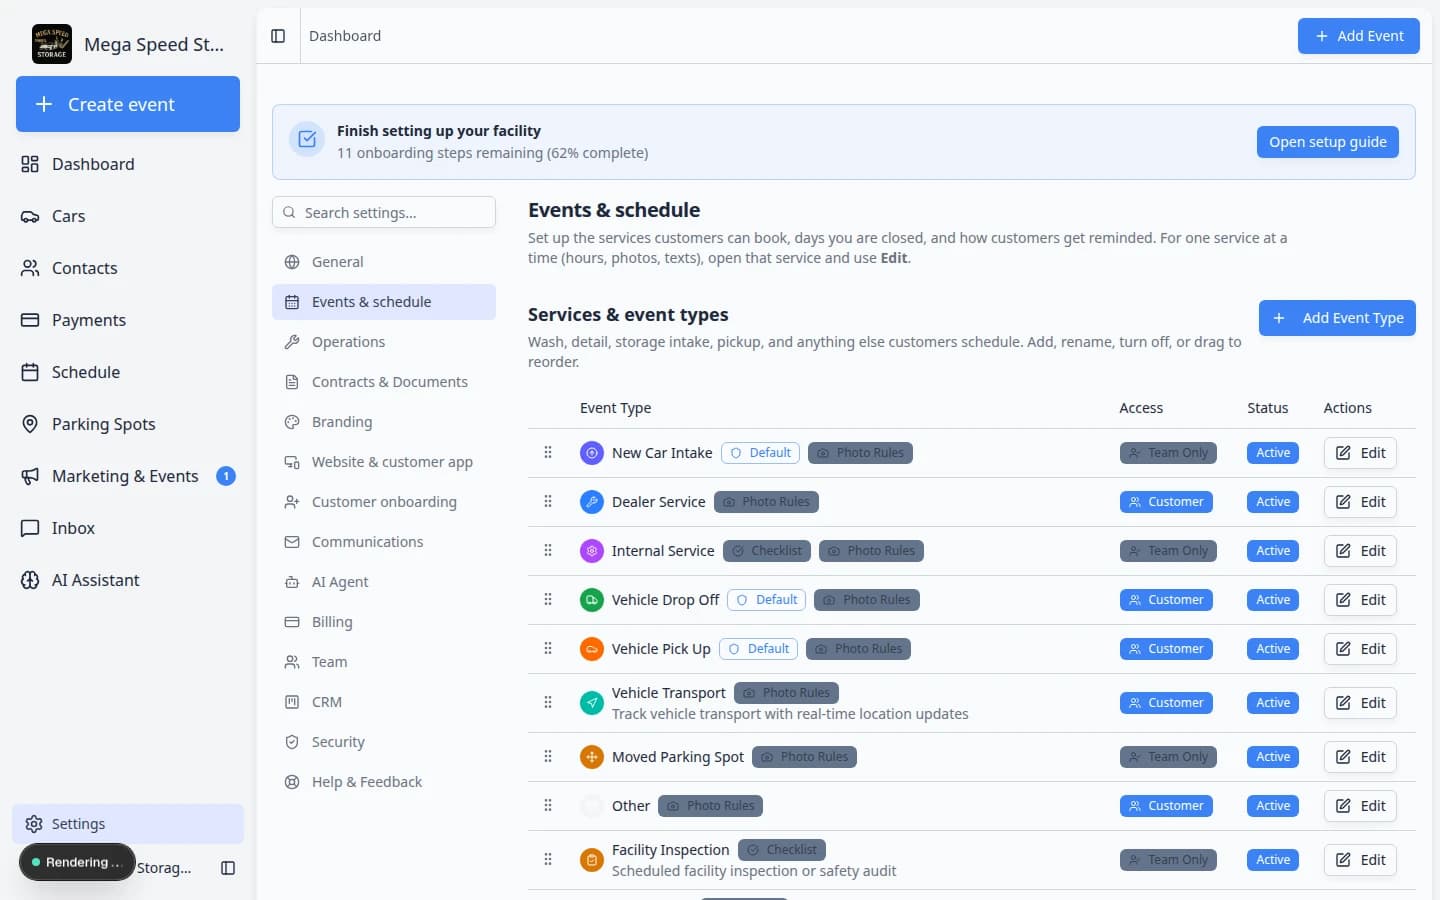
The Services & event types section shows each service as a card in a searchable grid. Each card shows the service name, whether customers can book it, and buttons to Set up (guided editor) or Advanced (full settings page).
The same page also includes Service plans, Create event screen layout, and Subscribe to your schedule. Scheduling hours, customer messages, photo rules, and closed days live on other settings pages—this guide focuses on event types first.
Create a new event type
- Click Add a service
In the Services & event types section, click the dashed Add a service tile.
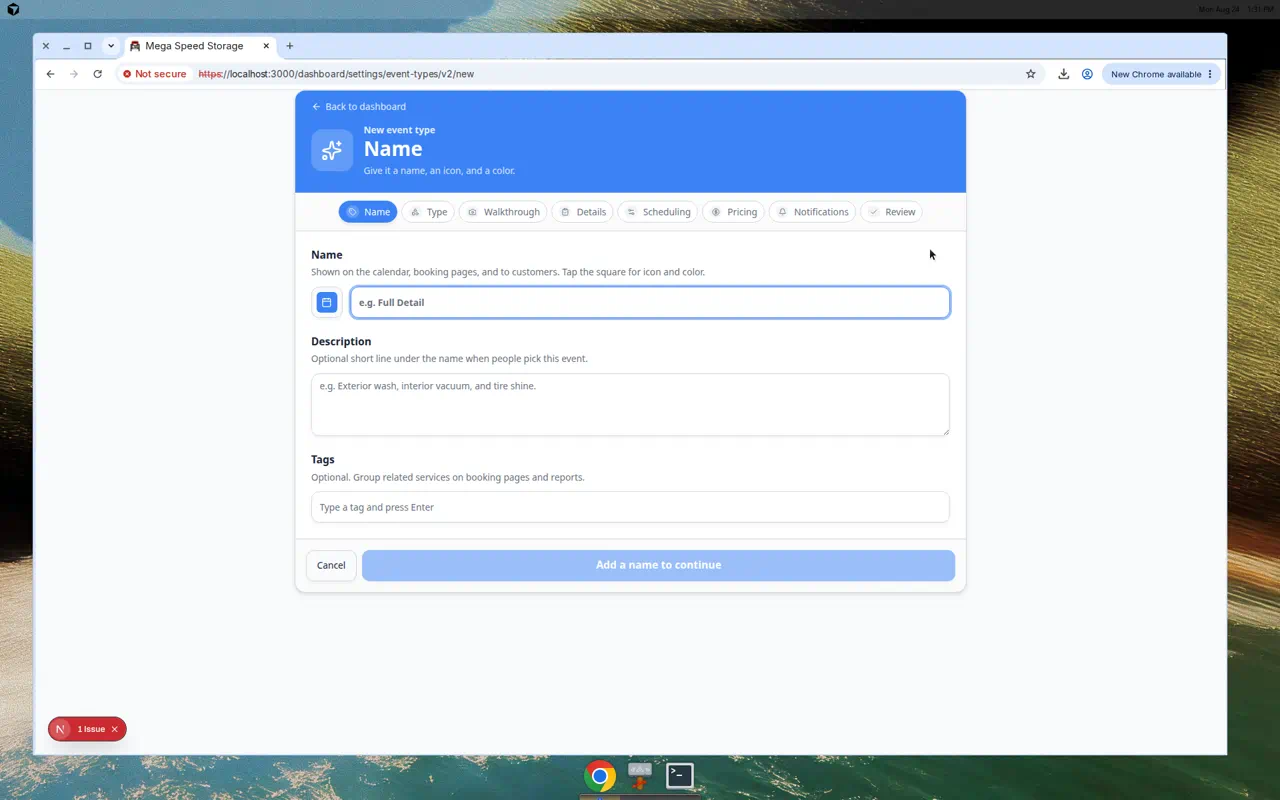
Expected result: The guided setup wizard opens at the first step.
- Enter the service name
Type the name staff should choose when they schedule or start this kind of work.
Good names are short and clear, such as Storage Intake, Detail Appointment, Vehicle Pickup, or Annual Inspection.
- Add a plain-English description
Explain when this event should be used.
Example: "Use this when a customer drops off a car for long-term storage."
This helps new teammates choose the right event type without asking someone else.
- Choose a color and icon
Pick a color and icon that make the event easy to recognize in lists and calendars.
The color and icon do not change how the event works. They only make it easier to spot.
- Continue through the wizard
Follow the guided steps for scheduling, photos, notifications, and other settings—or click Advanced at any time to jump to the full editor.
Expected result: When you finish, the new service appears as a card on Services & schedule and staff can use it on Schedule.
Edit the event type settings
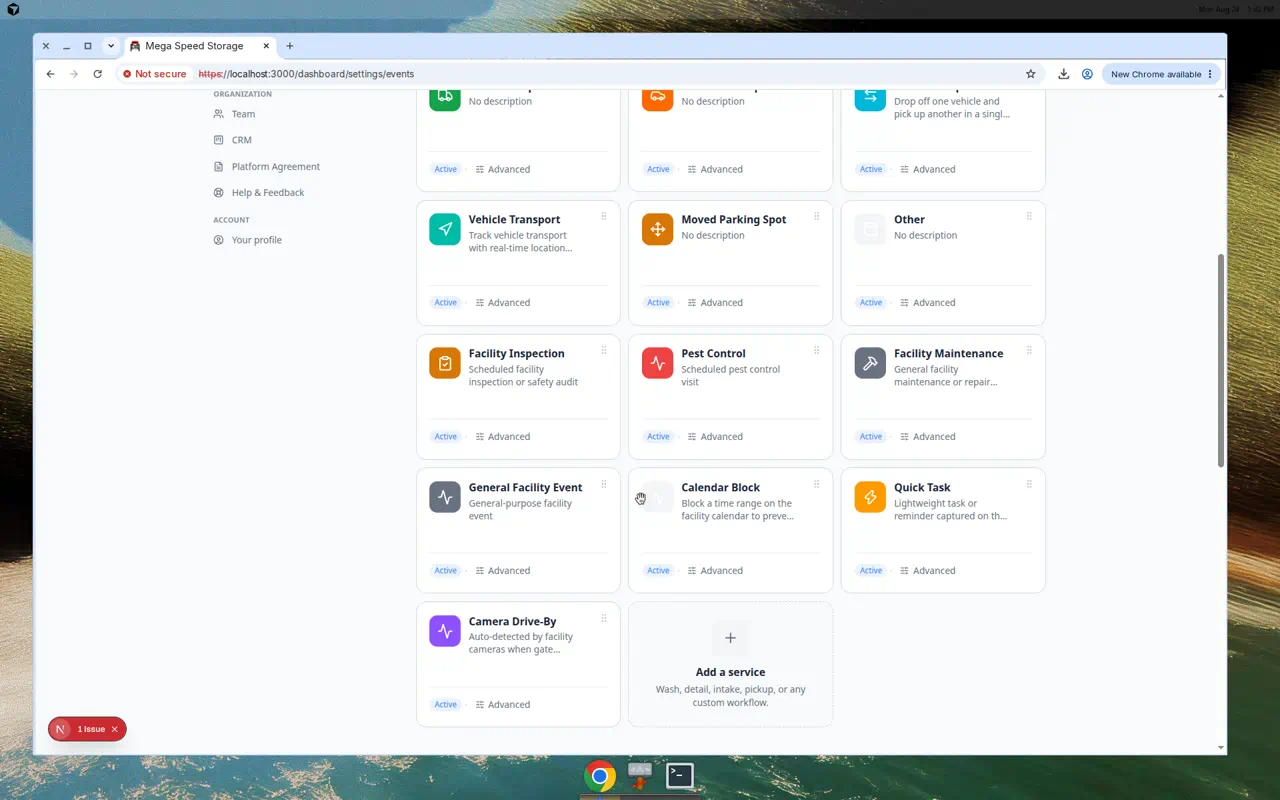
You can edit a new or existing event type from Settings > Services & schedule by clicking Set up (guided editor) or Advanced (full settings page) on the service card.
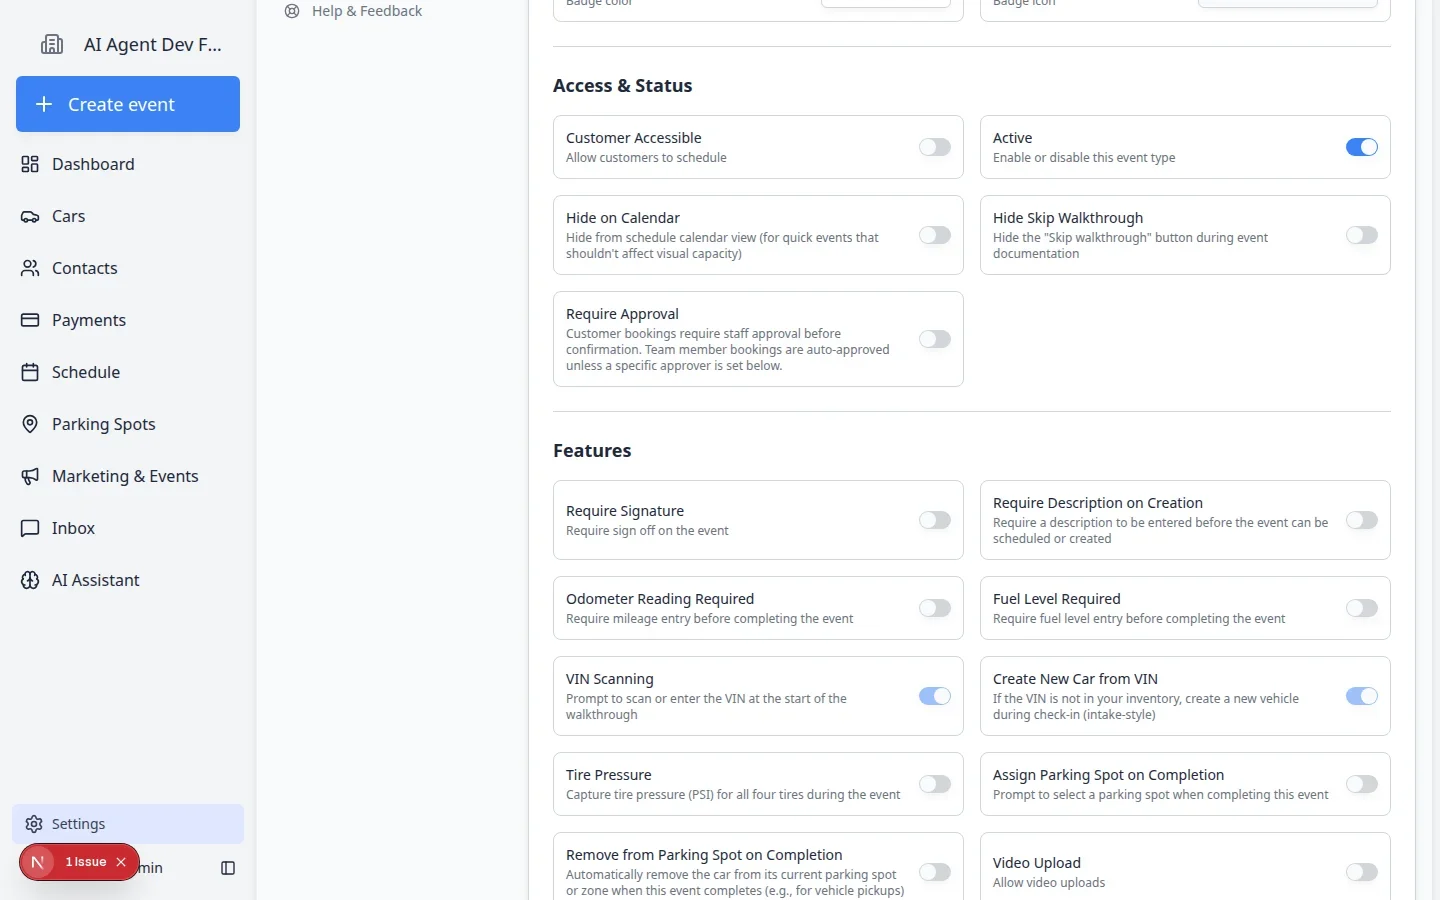
- Review Basic Information
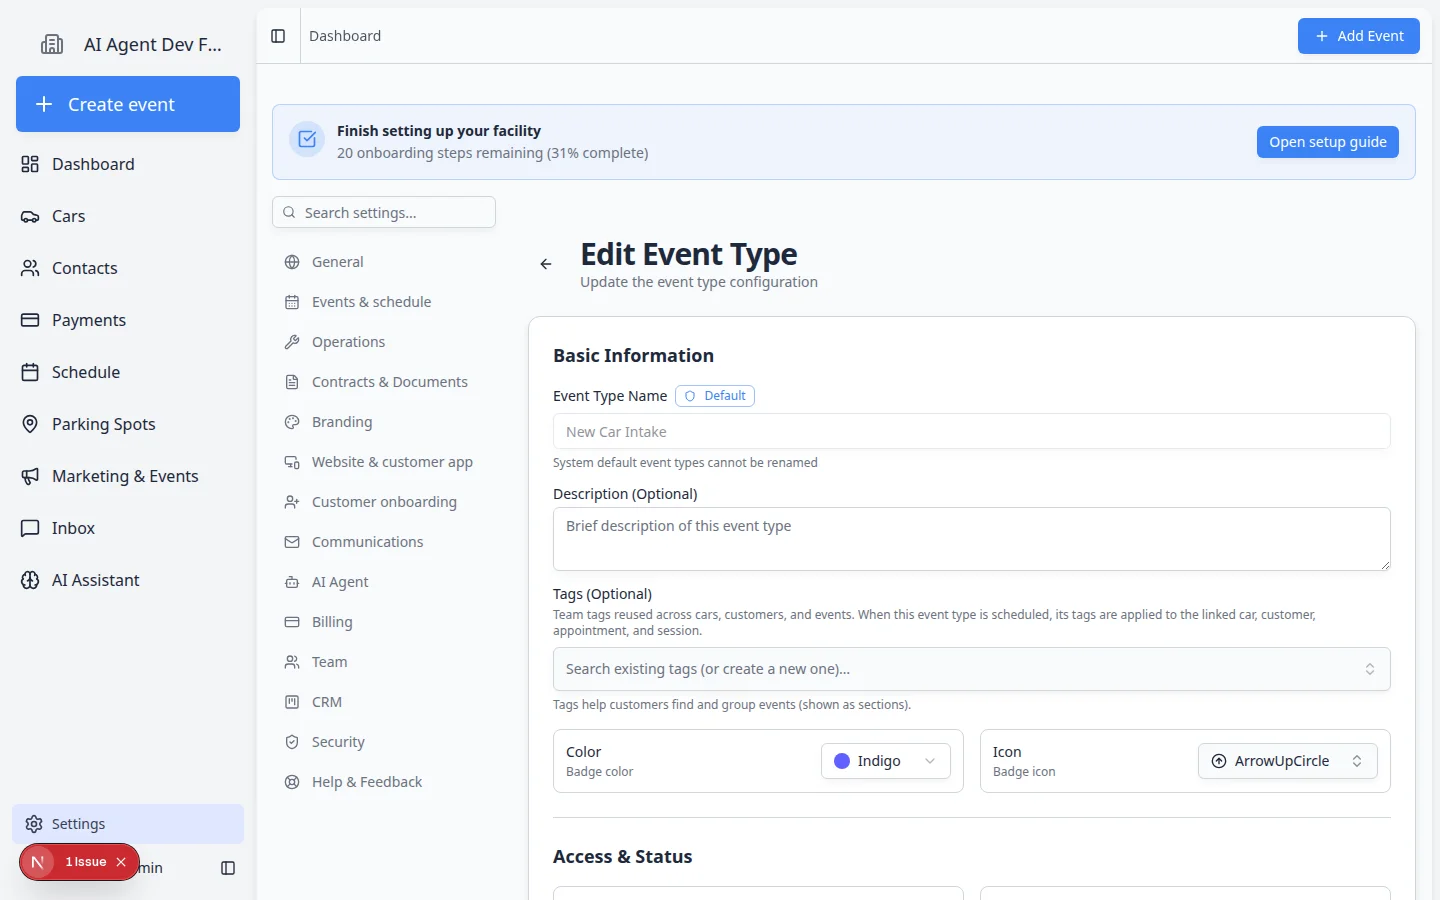
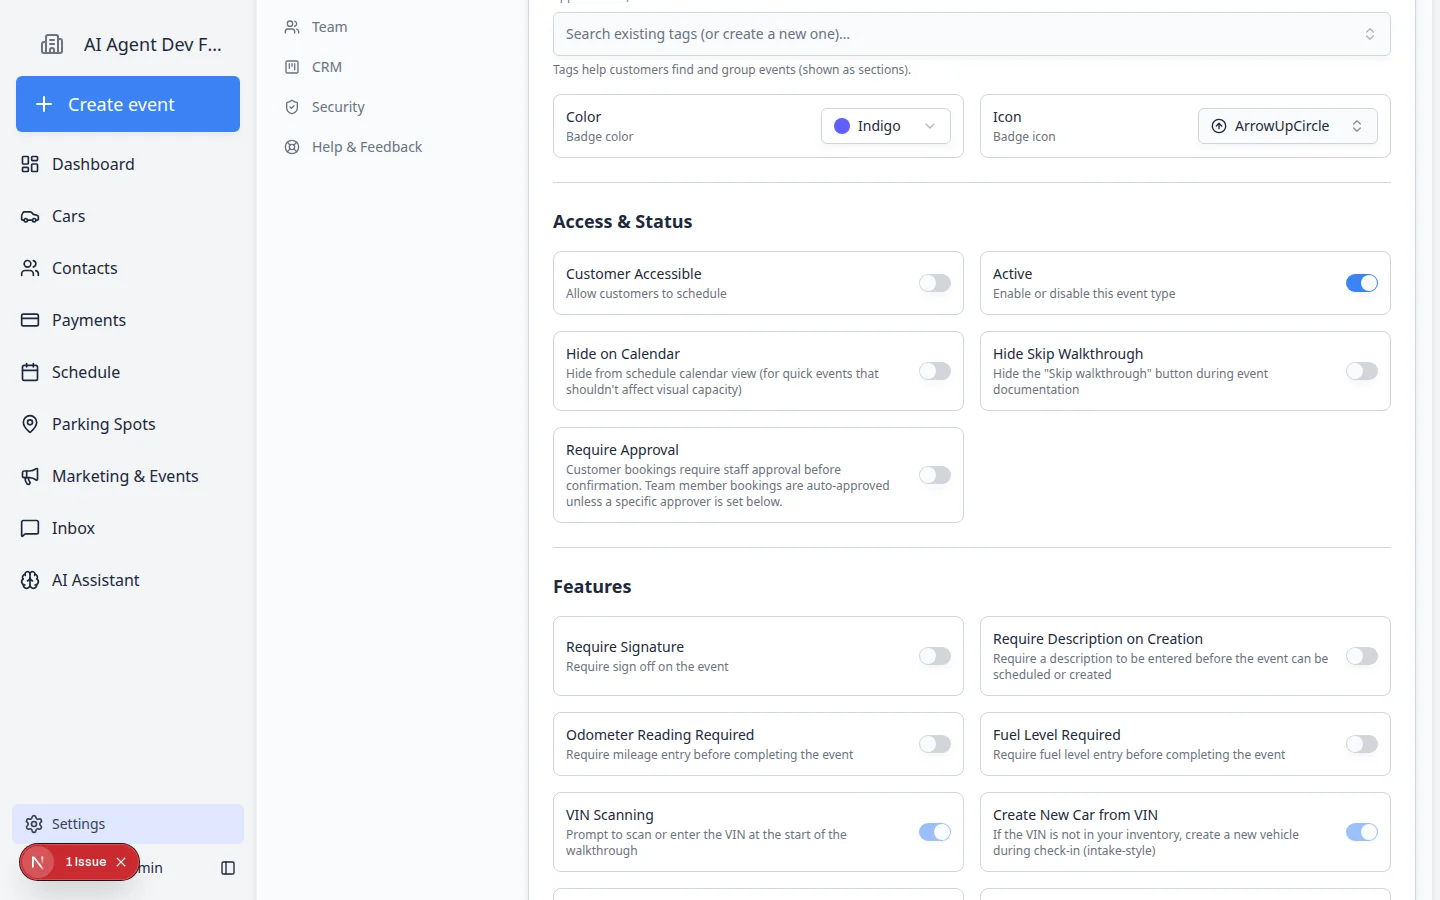
Confirm the Event Type Name, Description, Tags, Color, and Icon.
Some default event types cannot be renamed. If a field is disabled, that means the system protects that default event name.
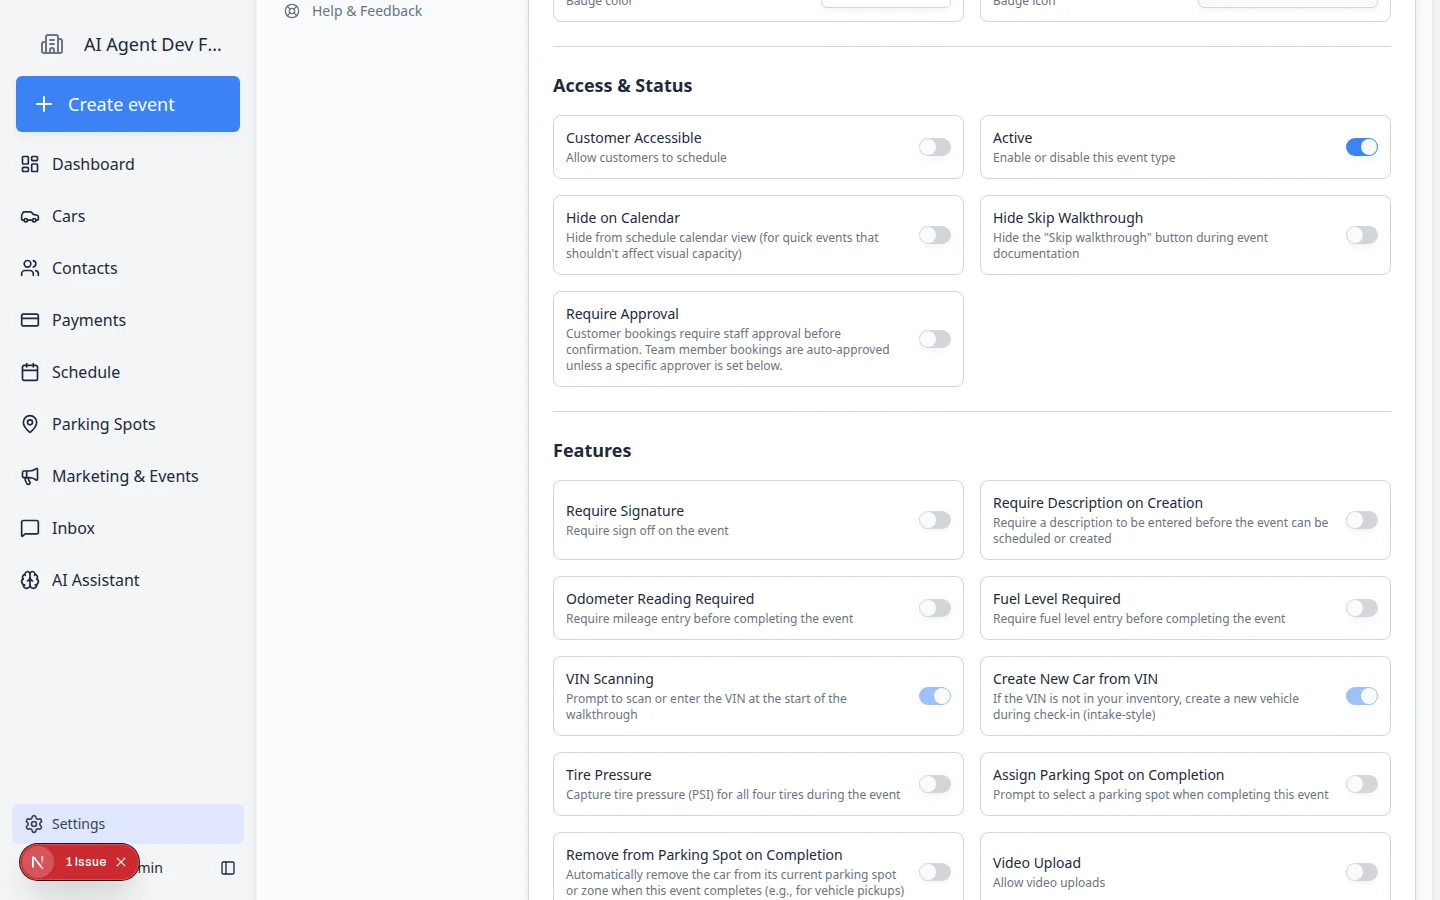
- Set Customer Accessible
Turn Customer Accessible on only when customers should be able to request or schedule this event.
Leave it off for internal work, such as staff-only inspections, lot moves, or admin tasks.
- Confirm Active is turned on
Active means the event type can be used now.
Turn Active off only when you want to stop using the event type for new events while keeping past history.
- Turn on Require Approval when customers book online
In Access & Status, find Require Approval.
Turn this on when a manager should review customer booking requests before they appear as confirmed on Schedule.
Why this matters: Without approval, customer bookings may go straight to the calendar. With approval, they wait in Needs Approval until staff accept them. See Approve or decline customer booking requests.
Optional: choose a Designated Approver (optional) if one person should always approve this service. Leave None — team members auto-approve if staff bookings should not need approval.
- Choose important workflow features
Turn on only the switches your team truly needs. Each one adds a step during the event.
If you need… Turn on… A written note every time someone creates this event Require Description on Creation Staff or customer sign-off before the event is done Require Signature Mileage recorded at intake or pickup Odometer Reading Required Fuel level recorded at intake or pickup Fuel Level Required Staff to record where the car goes when work finishes — a spot or zone, a vendor, or a customer taking it When this event completes → Ask where the car is going (see Parking Spots) The car to leave its spot when it is picked up or delivered, with nothing to fill in When this event completes → Mark it as gone Expected result: Only the fields your process needs appear when staff run the event.
When this event completes offers three choices for vehicle events, and you pick one:
- Leave the car where it is — nothing changes about the car's location.
- Ask where the car is going — staff choose a destination and the car moves there. Use the checkboxes underneath to limit which destinations they can pick.
- Mark it as gone — no prompt at all: the car's spot is freed and its vendor cleared. This applies however the event is completed, including dragging it to Completed on the calendar, which makes it the simplest option for pickups and departures.
- Set the Event Scope
Choose what the event connects to:
- Vehicle - use when the event is about a specific car.
- Customer - use when the event is about a customer but not one car.
- Facility - use for internal events that do not need a customer or car.
The scope matters because it decides what information the app asks for when someone creates the event.
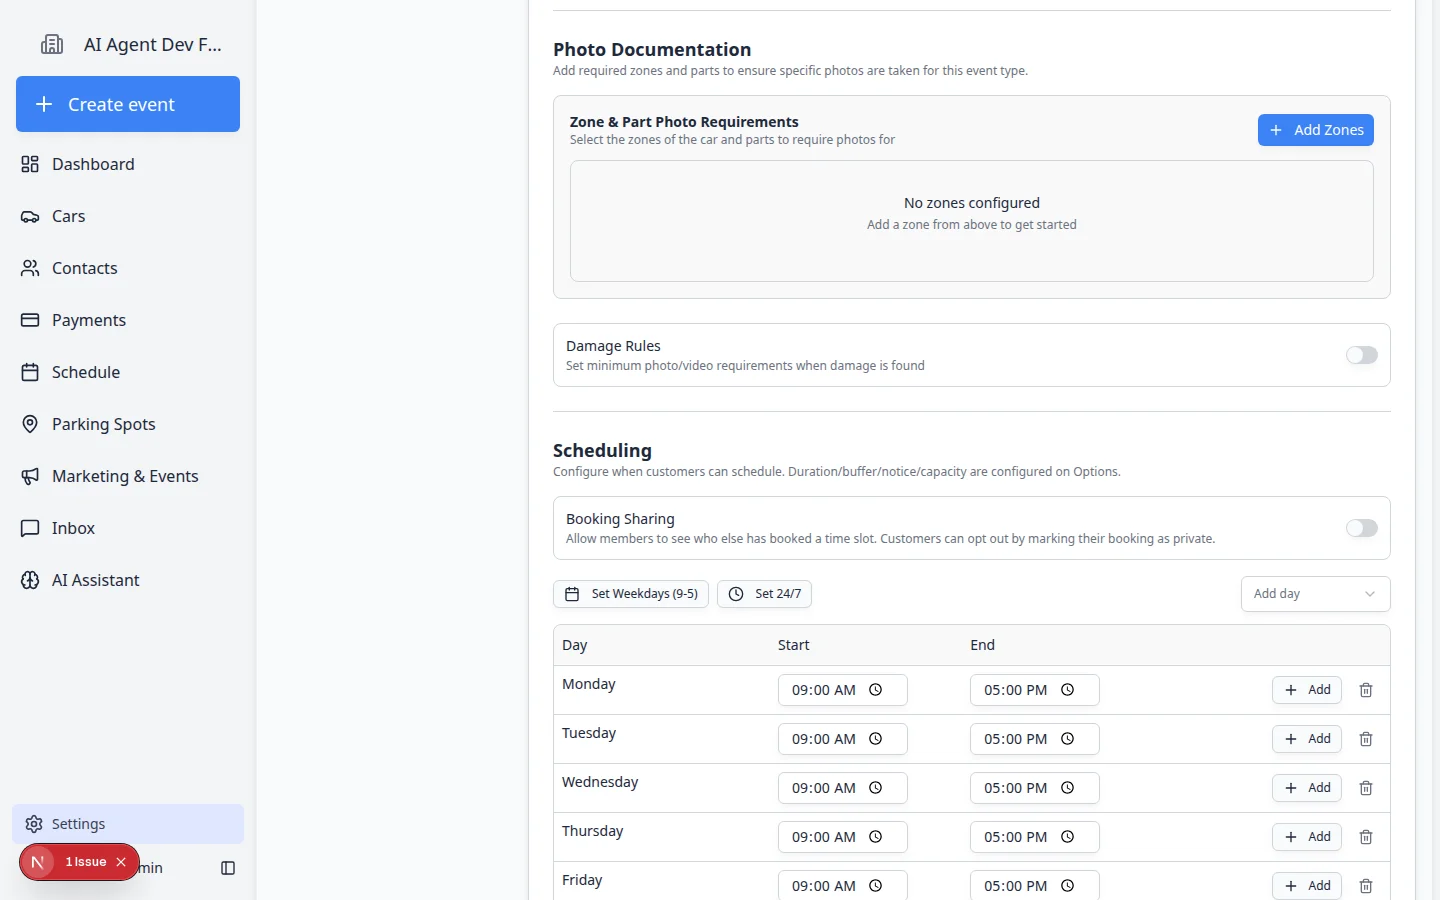
- Set Scheduling options
In the Scheduling section, set the days and times when this event can be booked.
Duration, buffer time, notice time, capacity, and service choices are handled in Booking Options. For a full walkthrough, use Configure scheduling and booking options.
- Wait for changes to save
The Edit Event Type page saves automatically as you work. Look for Saving… or Saved near the top of the page.
When you are finished, click Back to return to Settings > Services & schedule.
Expected result: The event type is ready for your team to use on Schedule and Create event.
Understand the Services & event types cards
Before you edit one event type, it helps to read the card grid on Settings > Services & schedule.
| Label on the card | What it means |
|---|---|
| Customer badge | Customers can request this service from the portal or website when Customer Accessible is on. |
| Team Only badge | Only staff can schedule this event. Customers do not see it on booking pages. |
| Photo Rules badge | This event type requires walkthrough or zone photos. See Configure photo rules. |
| Set up button | Opens the guided editor—best for first-time setup or quick changes. |
| Advanced button | Opens the full settings page with every option visible at once. |
What success looks like
After you save the event type:
- It appears in the Services & event types grid on Settings > Services & schedule.
- Staff can select it when creating events or appointments.
- If Customer Accessible is on, customers can request it from customer-facing booking pages.
- The event asks for the right customer, car, photos, checklist items, or resources based on your settings.
Tips for clear event types
- Use names that match how your staff talks every day.
- Create separate event types when the steps are different. For example, Vehicle Pickup and Vehicle Delivery usually deserve separate setups.
- Keep customer-facing event names friendly and easy to understand.
- Turn on only the requirements you truly need. Too many required fields can slow staff down.
Troubleshooting
What to do next
If customers or staff will book this event on the calendar, continue with Configure scheduling and booking options. If your facility bundles recurring care, see Set up service plans. If the event needs required photos, continue with Configure photo rules and Configure walkthrough photo defaults. If the event depends on limited capacity, continue with Set up bookable resources.
When the basics are saved, run Test an event setup before you turn on Customer Accessible for real customers.