Events
Configure scheduling and booking options
Set when an event can be booked, how long it takes, and which options customers or staff can choose.
What you will accomplish
You will set when an event type can be booked and how long each appointment takes on the Schedule calendar.
Good scheduling setup helps prevent double bookings, last-minute surprises, and appointments that do not leave your team enough time.
You will set two things on the event type edit page (Settings > Events & schedule → Edit on an event type):
- Scheduling - the days and hours when this event can be booked.
- Booking Options - the choices, duration, buffer time, notice time, capacity, and price links for the event.
Before you start
- Make sure the event type already exists. If not, start with Configure event types.
- Know which days and hours your team can perform this work.
- Know how long the work usually takes.
- Decide whether customers need choices, such as Basic Detail, Premium Detail, or Full Inspection.
- If the work uses a limited bay, lift, room, or staff member, set up the resource first in Bookable resources.
Open the event type
- Open Events & schedule
In the dashboard sidebar, open Settings, then click Events & schedule. You can also go directly to Settings > Events & schedule.
Expected result: You see the Services & event types table and sections for closed days, default messages, and photo rules below.
- Edit the event type
Find the service you want to update (for example Detail Appointment or Vehicle Drop Off) and click Edit on that row.
Expected result: The Edit Event Type page opens with sections such as Basic Information, Scheduling, and Booking Options.
- Scroll to Scheduling
Scroll until you see the Scheduling heading.
Expected result: You see weekday rows, start and end times, and buttons such as Set Weekdays (9-5) and Add day.
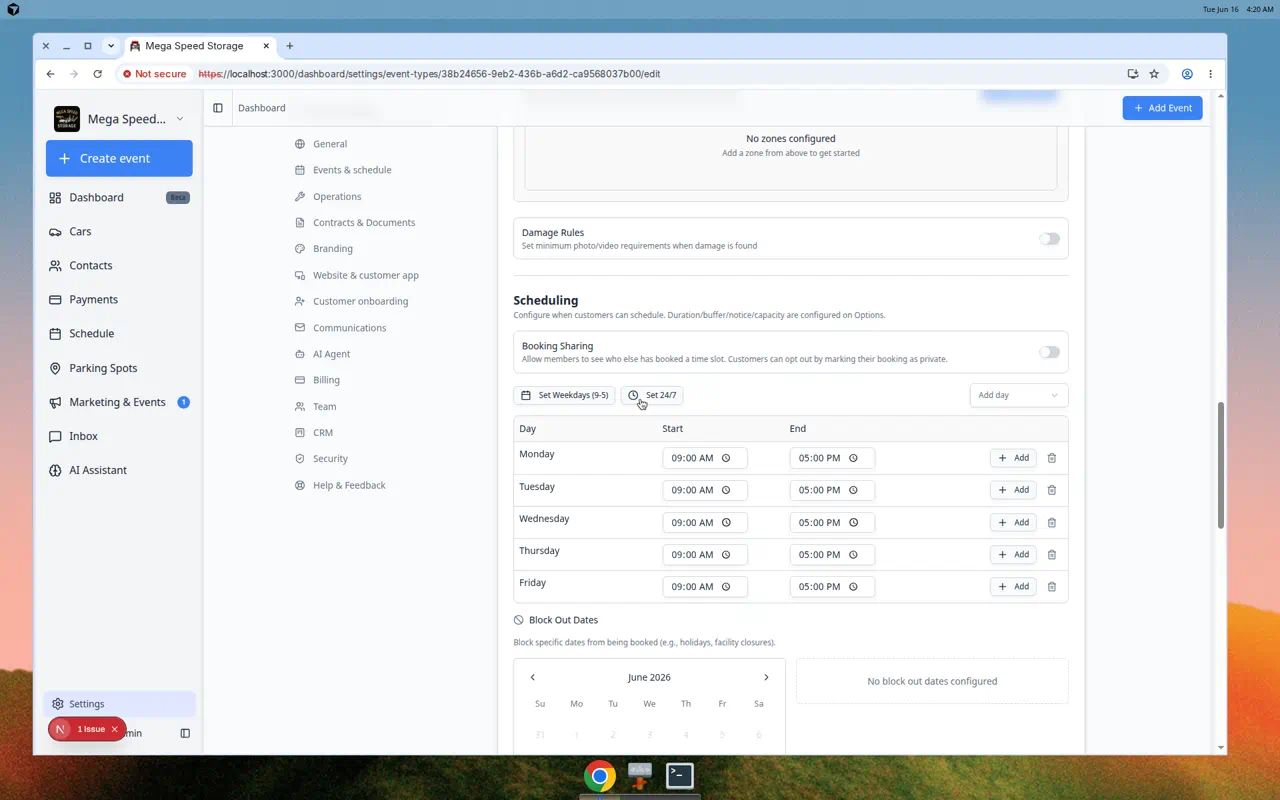
Set available days and hours
- Use Set Weekdays if the event follows normal business hours
Click Set Weekdays (9-5) if the event should be available Monday through Friday from 9:00 AM to 5:00 PM.
This is a good starting point for most customer appointments.
- Use Set 24/7 only when bookings can happen any time
Click Set 24/7 only for events your team truly allows at any hour.
For most facilities, this is better for internal blocks or special operations, not normal customer appointments.
- Add or remove days
Use Add day to make another day available.
Use the remove button on a day if customers should not book that event on that day.
- Adjust start and end times
Each day has a start time and end time. Set the hours when your team is ready to accept that event.
Example: If detail appointments need staff preparation time, you might use 10:00 AM to 3:00 PM instead of your full open hours.
Add booking options
Booking options are the choices people can select when scheduling this event.
Examples:
- Basic Detail - 1 hour
- Premium Detail - 2 hours
- Storage Intake - 30 minutes
- Annual Inspection - 90 minutes
If you do not create options, customers may book using the event type's default setup and may not see an option selector.
- Scroll to Booking Options
On the event type edit page, find Booking Options below the Scheduling section.
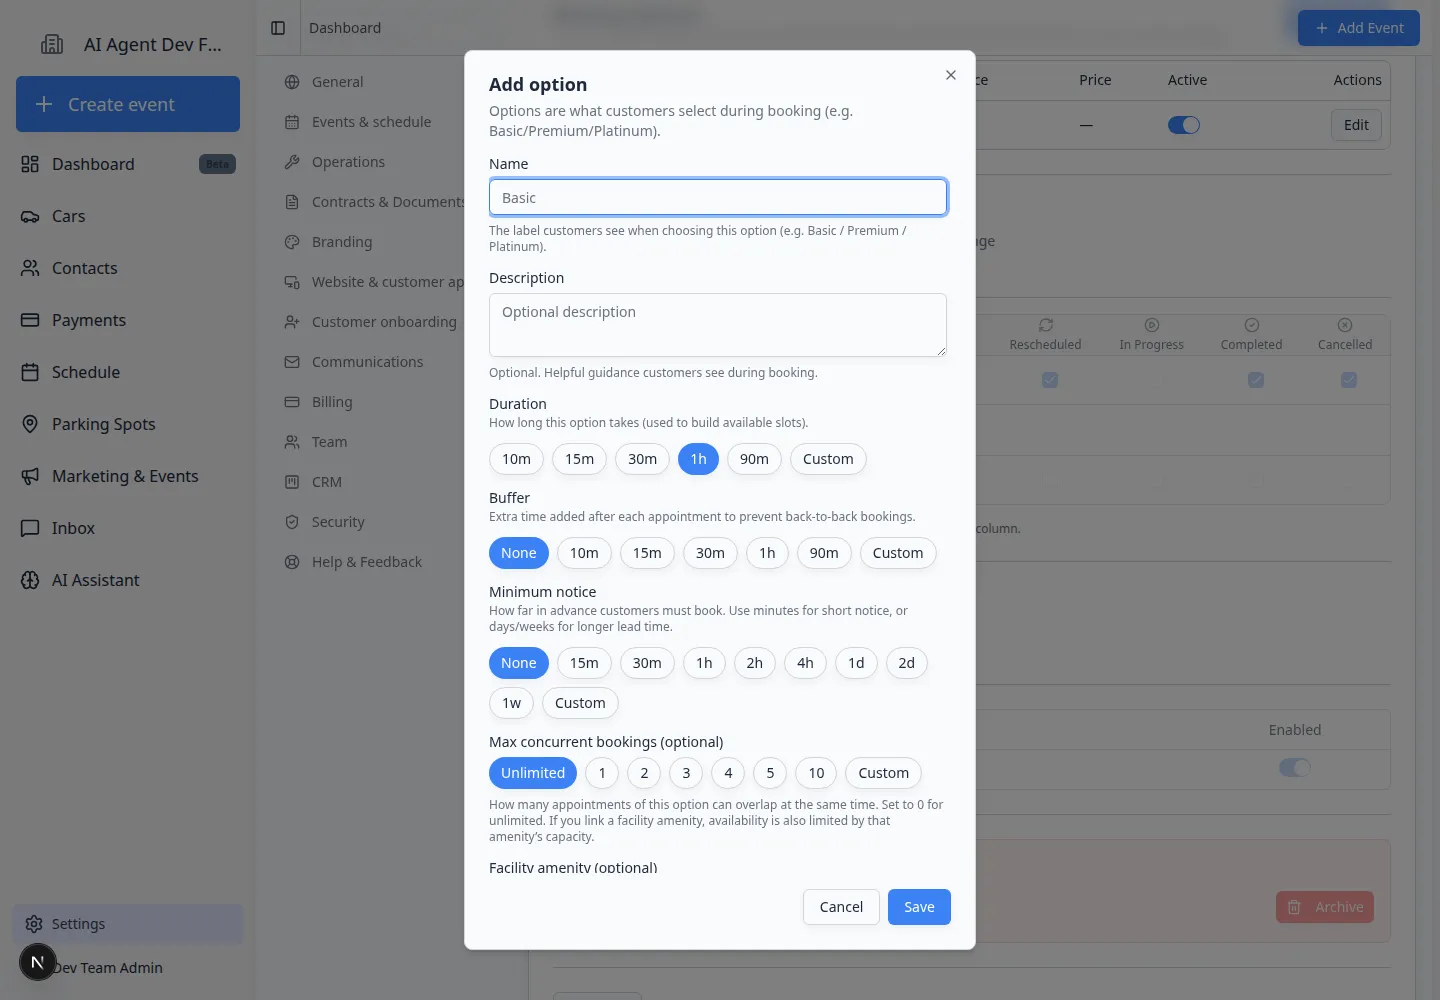
- Click Add option
Click Add option.
A window opens where you can enter the option details.
- Name the option clearly
Use a name that customers and staff will understand.
Good examples: Basic Detail, Premium Detail, Pickup Appointment, or Storage Intake.
- Add a helpful description
Use the description to explain what is included.
Example: "Exterior wash, interior vacuum, and quick wipe-down."
- Choose the duration
Duration means how long the appointment takes on the calendar.
Choose the real working time your team needs. Do not choose a shorter time just to show more openings.
- Choose buffer time
Buffer time is extra time after the appointment.
Use buffer time when staff need time to clean up, move a car, prepare the next bay, or finish notes before the next booking.
- Choose minimum notice
Minimum notice is how far ahead someone must book.
Example: If you need one day to prepare staff and space, set 1d.
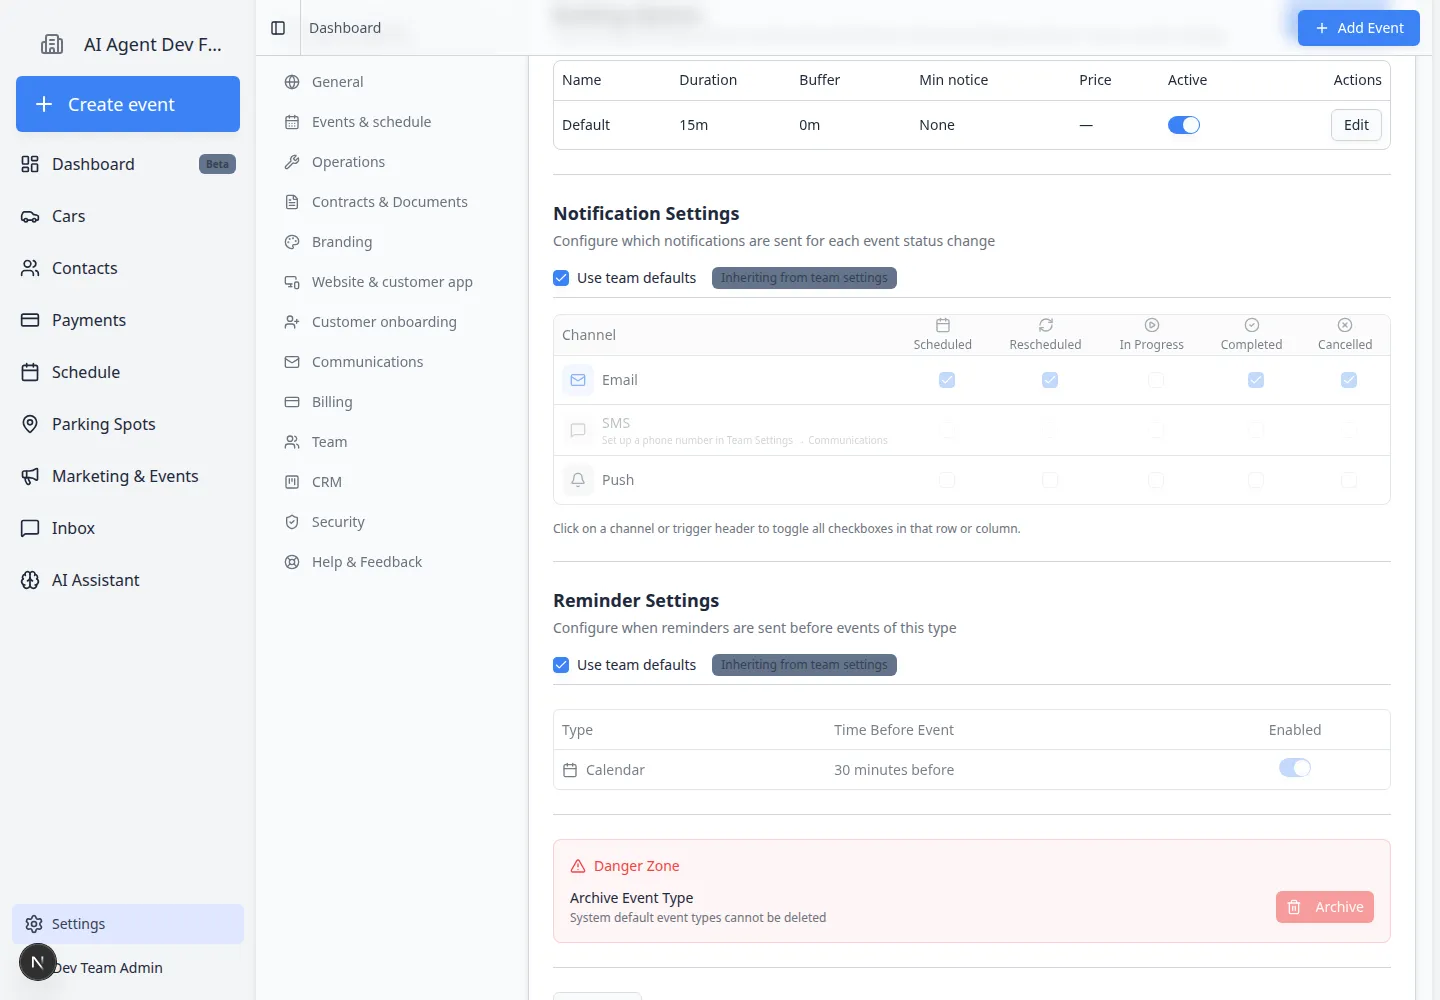
- Set capacity
Capacity controls how many appointments like this can happen at the same time.
- Use 1 when only one appointment should happen at a time.
- Use a higher number when your team can safely run several of this option at once.
- Use 0 when you do not want this number to limit slots (unlimited for this option). A linked Facility amenity can still limit bookings if you attach one.
Expected result: The capacity matches how many of this option your team can run in parallel.
- Link a price if customers pay when they book (optional)
If your facility collects payment at booking time, use Linked price (optional) to connect a product or service price from Payments.
You must finish Connect payment processing first. Skip this field if customers pay later on an invoice.
Expected result: Customers who book online see the correct price before they confirm.
Connect resources if capacity depends on a bay, lift, room, or person
If this event can only happen when a specific resource is free, connect that resource in the booking option.
For example:
- A Detail Appointment may need Detail Bay 1 or Detail Bay 2.
- A Maintenance Inspection may need Lift A.
- A Customer Tour may need the Showroom or a specific staff member.
If you have not created the resource yet, follow Set up bookable resources.
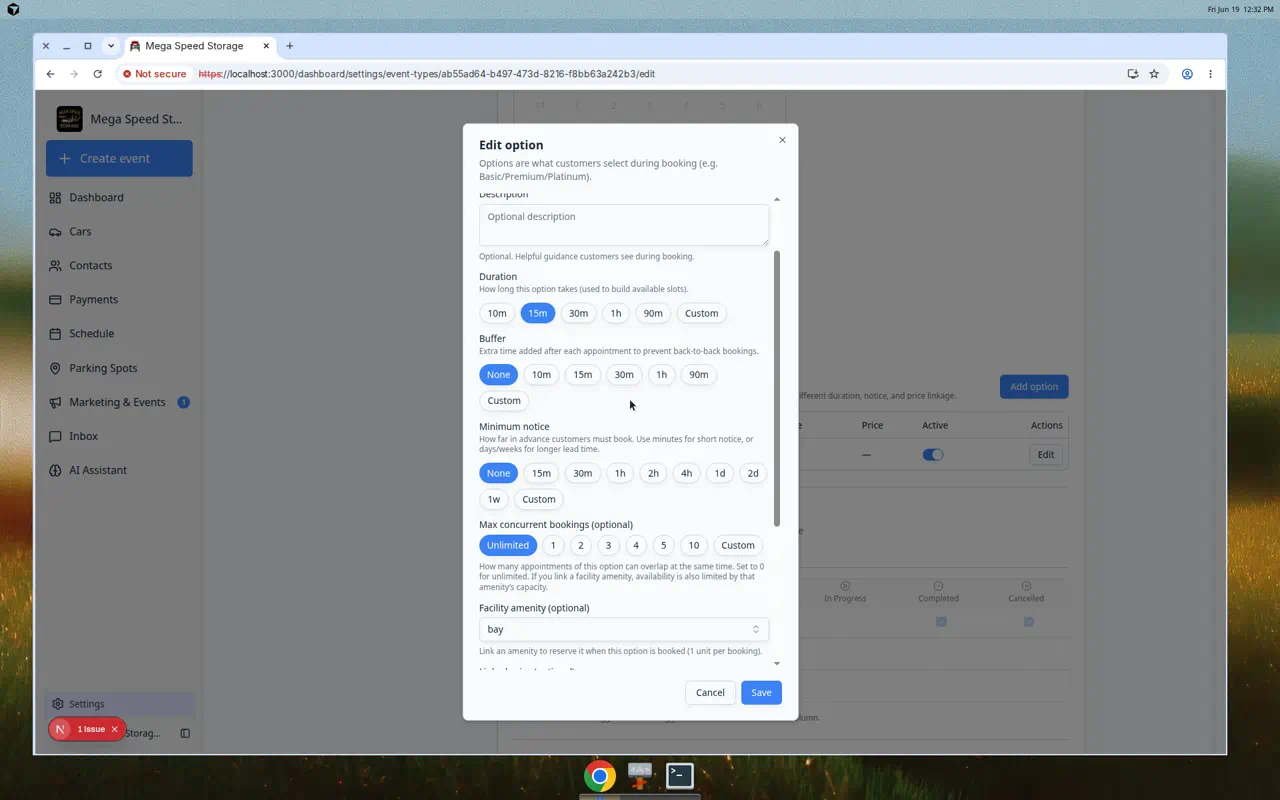
- Open the booking option
On the event type edit page, scroll to Booking Options and click Edit on the option that should reserve the bay, lift, or room (or click Add option first).
Expected result: The Edit option or Add option window opens.
- Choose Facility amenity (optional)
Open Facility amenity (optional) and pick the instance this appointment should use—for example Bay 1 under Detail Bay.
Why this matters: The calendar checks that instance before it offers a time slot. If Bay 1 is already booked, customers and staff should see fewer openings at that time.
Expected result: The amenity name appears in the dropdown before you save the option.
- Save the option and event type
Click Save on the option window, then Save Changes at the bottom of the event type page.
Expected result: The linked amenity shows on the Booking Options table row for that option.
Save and test
- Click Save Changes
After updating Scheduling and Booking Options, click Save Changes at the bottom of the event type page.
Expected result: Your changes are saved. If you leave the page and click Edit again, the hours and options you set are still there.
- Create a test appointment
Open Schedule, click Schedule Event, and choose this event type. Use a test customer or vehicle and add TEST in the description so your team can spot the appointment later.
Expected result: The Create New Event window shows time slots that match the days and hours you configured.
- Check available times
Pick an open day and compare the highlighted slots to your Scheduling hours, minimum notice, buffer, and any linked resource.
Expected result: Slots only appear when your rules allow them. A closed day or holiday should show fewer or no slots.
- Adjust if needed
If the times look wrong, return to Settings > Events & schedule, click Edit on the event type, and review Scheduling, Booking Options, closed days, and resources.
What success looks like
After setup:
- Customers and staff see time slots that your team can actually support.
- The appointment length matches the work being done.
- Buffer time protects your team from back-to-back pressure.
- Minimum notice prevents last-minute bookings when your team needs preparation time.
- Limited bays, lifts, rooms, or staff are less likely to be double booked.
Troubleshooting
What to do next
Run Test an event setup to confirm time slots, capacity, and any linked resource behave correctly.
If the event should not be available on holidays or special closure dates, continue with Set closed days for events. If customers should receive emails, texts, or reminders, continue with Set up event notifications and reminders.
If customers must approve before an appointment is confirmed, see Approve or decline customer booking requests.